If you are using ADvendio in any other language as English or you like to change the English wording to something your users understand better, you can use the following Salesforce tools:
Translation Workbench
The Translation Workbench lets you specify languages you want to translate or override labels and translations for the ADvendio package. Everything from custom picklist values to custom fields can be translated so your users can use all of Salesforce in their language. You can manage translated values for any of the Salesforce supported languages.
Translate
Navigate to the Setup > Translation Workbench > Translate.
![]()
To get started in the Translation Workbench:
- Select a language.
- Select a setup component, for instance Custom Field.
- If necessary, select an Object. For Instance, use Media Campaign as object and Field Label or Help Text as the object.
- Double click in the translation column to enter new values. You can tab to jump to the next row.
Override
Fields and help texts can also be overwritten by you, if the original value should be stored but the displayed value should be the overwritten one.
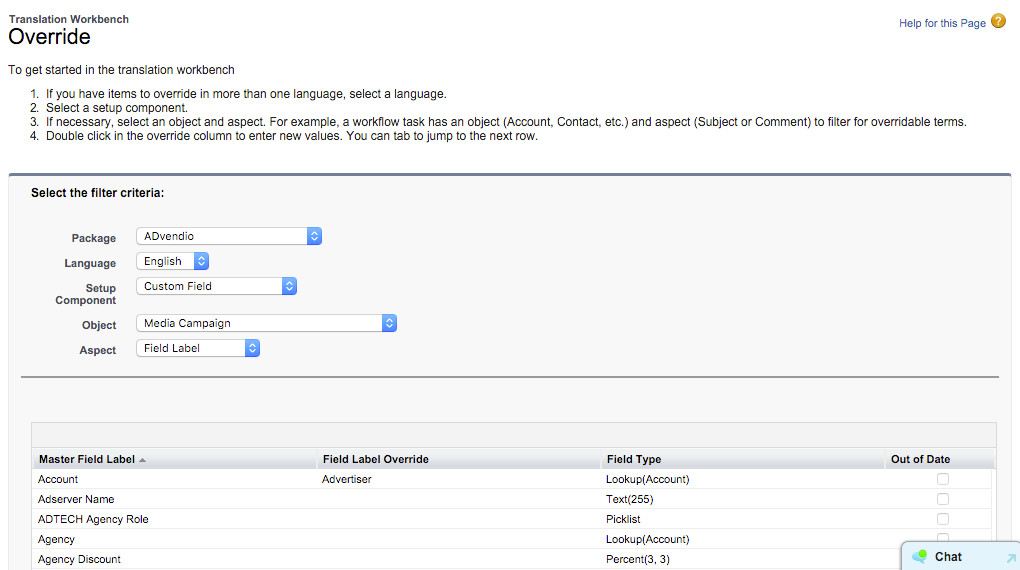
To get started in the translation workbench:
- Navigate to Setup > Translation Workbench > Override.
- If you have items to override in more than one language, select a language.
- Select a setup component, for instance Custom Field.
- If necessary, select an Object and Aspect.
- Double click in the override column to enter new values. You can tab to jump to the next row.
Export
You can export three different kinds of text.
- Source - Produces one .stf file that contains all of the text that is translatable
- Untranslated - Produces a set of files, by language, with text that is not yet translated
- Bilingual - Produces a set of files by language that contain all of the text that is translatable
Salesforce translation files are exported in the UTF-8 encoding to support extended and double-byte characters. This encoding cannot be changed. Field labels can only be translated using max. 80 characters. The help text or description of a field can be translated using max. 255 characters. The import will fail, if translations are to long or the csv/stf file have more columns, than expected.
Bilingual
All language strings are exported to the object called Documents. For each language a new file will be generated and all language files are stored in a zip file (Examples: Untranslated_de_2015-10-30 0231.sft, Untranslated_es_2015-10-30 0231.sft...). If the suffix is changed from stf to csv, you are able to open the file with Open Office.
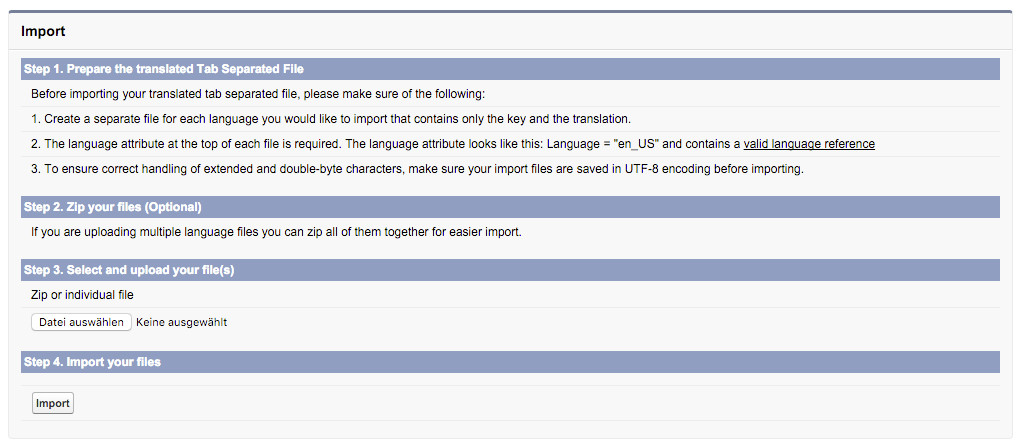
Import
Before importing any file you have to make sure, that your CSV file is prepared with the right information. It is not possible to import a tab separated file with different languages. Each import filed should consist of only one correct language. Please make also sure, that the header of the file are prepared correctly with language code and type. For instance, the type bilingual is not allowed and their should also only two columns. The first one should have the target label and the second one should have the correct translation.
If the suffix is changed from csv to stf, you are able to import the translated labels:
- Create a separate file for each language you would like to import that contains only the key and the translation.
- The language attribute at the top of each file is required. The language attribute looks like this: Language = "en_US" and contains a valid language reference.
- To ensure correct handling of extended and double-byte characters, make sure your import files are saved in UTF-8 encoding before importing.
- If you are uploading multiple language files you can zip all of them together for easier import.
- Upload the file by navigation to Setup > Translation Workbench > Import and select your stf file (or zip).
- Click the button Import.
Translation of Objects and Tabs
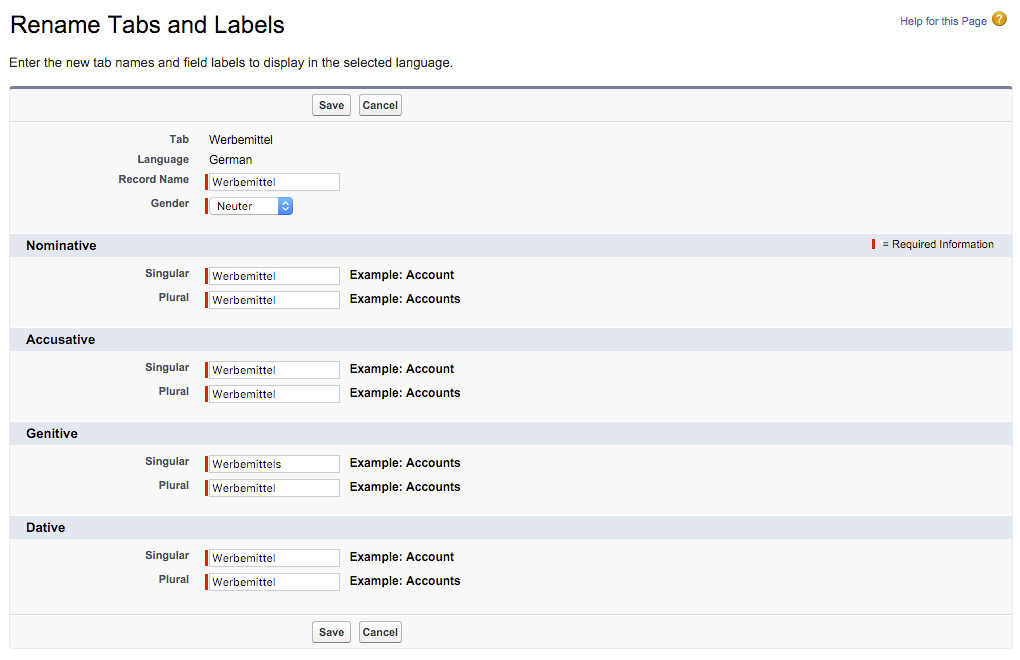
Objects can be translated for different languages:
- Navigate to Setup > Customize > Tab Names and Labels > Rename Tabs and Labels and select the object that you want to translate.
- Choose the right language in the field Select Language.
- Scroll down to the related list Custom Tabs to translate an ADvendio object and click the button Edit.
- Enter the new tab names and field labels to display in the selected language.
- Click the button Save.
Translation of Custom Labels
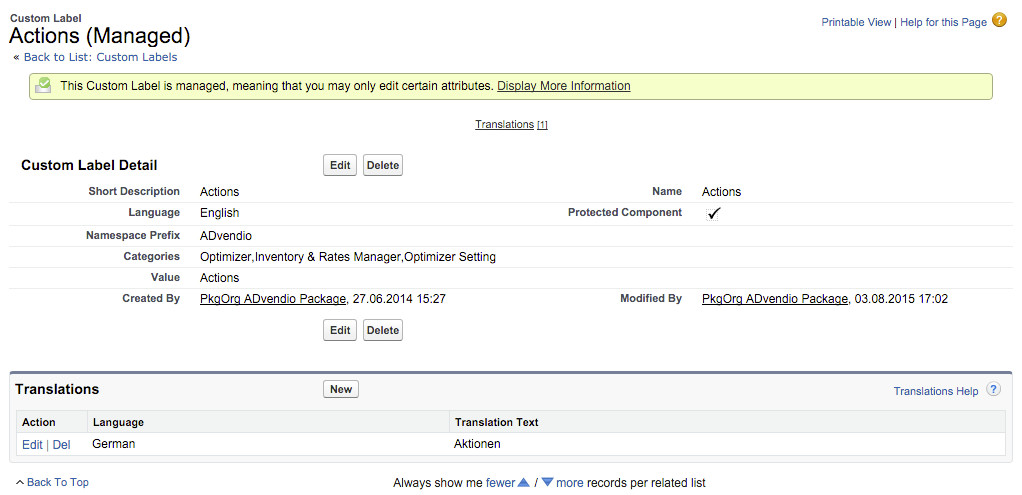
Custom Labels can be translated for different languages:
...