ADvendio provides the user with a hierarchy of complex objects with many fields. In order to add a new record which often is similar to existing data the user now has to tediously fill out all the fields and add all the child records. Many customers had already requested custom clone functions. To simplify this process ADvendio offers a generic and reusable "clone" function.
...
Navigate to the Generic Clone Configuration:
Navigate to the App Launcher.
Search for Generic Clone Configuration.
Create a new Configuration Setup Record
...
To create a new Generic Clone Configuration click the button New Configuration Setup. Of course any Any record can be edited or deleted later.
Configuration
After entering the name and description select the object, you want to clone.
...
Enter all relevant data and select the corresponding object.
Enter a Configuration Setup Name.
Enter a Description.
Filter Object Filter for ADvendio objects Only or standard salesforce objects.
...
In the field Select the start object to configure
...
and select the main object to be cloned from the drop-down menu options.
Click the button Continue.
| Note |
|---|
Please always choose the start object which is highest in the hierarchy. All related objects will be selected in the next step. |
...
The next page has four sections:
1. Options
Define the Depth of Child Object.
Define the Cloning confirmation. (if configurable the end user gets a page to select or de-select child objects.)
No Confirmation: Doesn't show any confirmation message while starting the cloning process. The cloning process starts automatically as soon as the user clicks the clone button at the target record.
Confirmation - Objects Not Changeable: Shows all objects being cloned in a tree structure. Users can't deselect any object in the tree. The user needs to confirm the selection in order to start the actual clone process. This is the default option.
Confirmation - Objects Configurable: Shows all objects being cloned in a tree structure. Users can deselect objects in the tree to exclude them from cloning. The user needs to confirm the selection in order to start the actual clone process.
...
2a. Start and Child Objects
Define Start and Child Objects which you like to be cloned by checking the appropriate checkbox(es) in front of the object names. The maximum depth of child objects is three.
2b. Cloning Condition for Object XXX
Define Cloning Condition for
ObjectObject Media Campaign (Media Campaign is only an example) and handle Action
,if the condition not met.
Clone Anyway: Clones the record.
Clone With Warning: Clones the record, and creates a warning message containing the object name and record ID shown to the user.
Interrupt Clone:
This will not clone and interrupt the whole cloning process. An error message containing the object name and record ID is shown to the user.
Skip record.
Select Field path and Operator from drop-down values if necessary.
Define Field Configuration for Object Media Campaign (a Media Campaign with all its fields is only an example).
TheThe drop-down lists Action contains a few different actions depending on the field, field type, and permissions.
Clone: Will copy the current record’s field value. This is the default action.
Adaptive Clone: Will set the reference/lookup adaptively. This is only for fields with a Lookup data type.
Leave Empty/Default:
This will null out the value, so the new record’s field will either have nothing or a default value if one is specified for the field.
Set Value:
This will allow field values to be specified. Reference fields will show a lookup to select a record.
Clone with Prefix: Will add a text before the cloned value. This is only for fields with a String data type.
Clone with Suffix: Will add a text after the cloned value. This is only for fields with a String data type.
Click the button Save/Cancel to save/discard the changes.
3. Repeat steps 2a. and 2b. for all objects you like to clone.
| Info |
|---|
You can configure the fields for all child objects in the same way. Please click on the corresponding child objects in the list Start and Child Object and define fields and values. |
...
Create Clone Button
To give users the possibility to use Generic Clone, the system administrator has to create a custom button.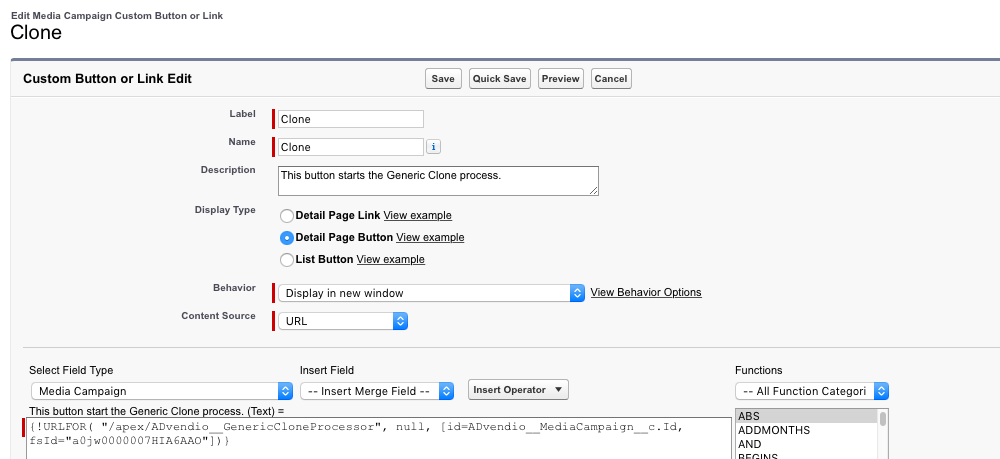
...
Enter the information below to generate a custom button and use Generic Clone:
Navigate to Setup > Object Manager > "Objectname" > Buttons, Links and Actions and click the button New Button or Link.
Enter a Label.
Enter a Name (the field Name should be filled automatically but it is possible to change the API name).
Enter a Description.
Select the Display Type (Detail Page Button).
Select Behavior (Display in new windows) and Content Source (URL).
Enter the following code into the textarea field: {!URLFOR( "/apex/ADvendio__GenericCloneProcessor", null, [id={VariableOfIdOfTheMasterRecord}, fsId={IdOfTheGenericCloneConfiguration}] ) }.
Classic: The IdOfTheGenericCloneConfiguration can be found by opening the newly saved cloning configuration and copying the URL out of the browser.
Lightning: The IdOfTheGenericCloneConfiguration can be found by opening Feature Settings and searching for Feature Name = "GenericCloneDetailConfiguration" and the Template Name as the name of the object you want to Clone. The ID is the Feature Setting Name.
Click the button Save.
See the following code example to configure your Generic Clone feature correctly:
→ Code Example:
Code Block {!URLFOR( "/apex/ADvendio__GenericCloneProcessor", null, [id=ADvendio__MediaCampaign__c.Id, fsId="a0jw0000007HIA6AAO"] ) }
Drag the new button into the page layout and the feature can be used.