...
...
...
License Plan/Edition | AMS |
|---|---|
Version | 2.151 and higher |
Challenge
Defining relevant Contacts per Campaign and display them later on offer and invoice PDFs.
...
Solution
The Contact Wizard helps users to select the right contacts for his their campaigns quickly. This feature It shows the user only the contacts related to the involved accounts. The selected contacts are displayed afterwards at the corresponding media campaign at in the related list Campaign Contacts.
Create/Open a Media Campaign
Working with the Contact Wizard expects you to have a Media Campaign created already. If you are not familiar with Media
...
Campaigns please refer to this Wiki article: 1.1.5 Create a Media Campaign
The Media Campaign contains different Account lookups, that should be used in order to select Contacts in the Contact Wizard.
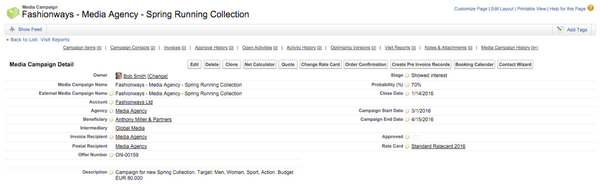
Select a Media Campaign and select all relevant Account lookups:
Navigate to an existing Media Campaign. Otherwise, you have to create one first.
Please select Accounts for the following lookup fields:
Account (Advertiser)
Agency
Beneficiary
- Deptor
Debtor (formerly Invoice Recipient)
Intermediary
Postal Recipient
Click the button Save.
If a lookup is not used, the user can skip that lookup. In this case, the Contact Wizard does not show any contacts, that can be selected.
Open the Contact Wizard
To open the wizard go to the Media
...
Campaign where you would like to assign Campaign Contacts. Open the actions menu and hit the action “Contact Wizard“.
| Info |
|---|
If you can not see the action please contact your administrator to add the right action to the layout. |
...
The Campaign Contact Wizard helps users to add new campaign contacts to an existing media campaign. It only displays those contacts assigned to the media campaignMedia Campaigns Accounts.
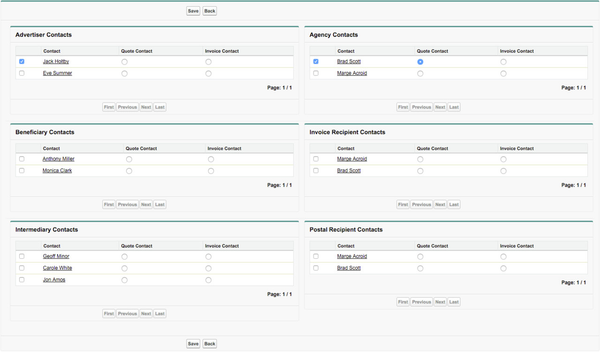
Select Media Campaign contacts using the Contact Wizard:
...
You can see a tab at the top of the page for every Account type that was set in the Media Campaign.
Go through the different tabs to define your Campaign Contacts per Account type.
The checkbox button on the left allows you to define a new Campaign Contact. You can also search through the list of available Contacts.
In addition to that you can select Contacts as Quote Contact or Invoice Contact
...
Accounts, Contacts and Contact Roles are used for the PDF (quote as well as invoice). The in the list on the right so that they will be shown on your offer or invoice PDFs. Your system administrator is able to customize, which contact should be displayed in which order on the PDF document. Note: Contacts can be deselected by setting the checkbox in front of a Contact to FALSE.Further information can be found in the Setup section below.
After setting up all the details you can hit the Save button in the upper right corner.
The Campaign Contacts can be found in the related list “Campaign Contacts“ of your Media Campaign afterwards.
...
Setup
Please add the Contact Wizard action to the page layout of the Media Campaign. You can differentiate the old and new Wizard by the name. The Lightning Contact Wizard action has the name “LwcContactWizard“.
Customize the Contact Wizard
You can adjust the Contact Wizard to show different information per Contact record in the list on the left and on the right.
To do so please refer to the following Feature Setting:
Feature Setting Name | ContactSettings |
|---|---|
Feature Name | ContactWizardLightning |
Value | Default: {"ContactField":"Department","AdditionalColumns":[]} Explanation:
Example: {"ContactField":"Department","AdditionalColumns":["Department","Email","Phone"]} |
Campaign Contacts on Offer and Invoice documents
To customize which in which order contacts are displayed at the address block (1st page at PDF) or the contact information (2nd Page at PDF) please follow the steps below.
Navigate to App Launcher > Quote Preferences or App Launcher > Invoice Preferences and select the corresponding record.
Edit the settings for Address Block (1st Page) and Contact Information (2nd Page).
Default: The default changes all picklists to default.
Not selected: This field is not used for the order.
Possible Picklist Values:
Quote Preferences:
Address Block (1st Page): Account, Agency, Beneficiary, Intermediary, Debtor, Postal Recipient
Contact Information (2nd Page): Account, Agency, Beneficiary, Intermediary / Owner, Debtor, Postal Recipient
Invoice Preferences:
Address Block (1st Page): Account, Agency, Beneficiary, Intermediary, Debtor, Postal Recipient
Contact Information (2nd Page): Account, Agency, Beneficiary, Intermediary / Sales Representative / Owner, Debtor, Postal Recipient
Click the button Save.
...
| Info |
|---|
Contacts can be mapped using the Mapping BA from Media Campaign to Invoice. |
| Info |
|---|
The ADvendio default is:
|