In order to take full advantage of the proposal pdf generator functionality, customize the proposal's layout to fit your company's needs.
If you are using legal entities please take a look here 7.2.6 Configure Legal Entities.
1. Quote Preferences
Open the App Launcher and search for Quote Preferences.

1.1 Create a new Preference Record
Click on the New button and select the format for your PDF:

When you create a new proposal, you can choose between different record types: one in portrait format, the other in landscape format.
1.2 Quote Settings

You can either create a new layout or edit an existing layout. In both cases you are able to change numerous aspects of the layout's design:
- Show Cover Letter: Check if you need the first cover page or not.
- Value discount Scales: Provide pricing information which shows on all proposals: Enter volume discount scales which are printed on your PDF if you offer those to all of your customers (You can store different version if using Legal Entities).
- RecordType Name: Displays your chosen record type and lets you change it here.
- Quote Preference Name: Give your Settings a name
- Logo file name: Displays the selected image file for you logo. Pls use 6. to select it.
- Logo: Add an image to your proposal (max 100x200 px). Make sure to tick the checkbox 17. "Show Logo". Read here how to customize this: 7.5.1.3 Add your Customer's LOGO to PDFs
- Show Gross Campaign Cost: Displays the Gross Amount on your proposal if checked.
- Hide additional fees: Hides the "Additional Fees"
- Left Header Image Source: Allows you to additionally to your logo display the Logo of your customer, agency network or other. Either on the left or right see 9.
- Left Header Image only on First Page: Defines if Left Header Image is displayed on Cover Page
- Show Left Header Image on Proposal: Defines if Left Header Image is displayed by Document Type Proposal
- Show Left Header Image OrderConfirmation: Defines if Left Header Image is displayed by Document Type Order Confirmation
- Show Left Header Image on Cancellation: Defines if Left Header Image is displayed by Document Type Cancellation
- Disable Page Break before Text Blocks: Disable Page Break before Text Blocks: Disables Page Breaks before your Text Blocks
- Show Signature Block below Text Blocks: Displays the signature block below the text blocks if you have customers who sign your document and send them back.
- Active: Tick the checkbox to activate the layout. If you are not using Legal Entities only the ONE active settings record gets used for all proposals.
- Show Logo: Check this if you like to display the logo. Make sure you have selected an image in 5.+6.
- Hide Notes Box - always: Always hides the Notes Box below the table
- Hide Notes Box - if empty: Only hides the Notes Box below the table if the description field is empty.
- Right Header Image Source: Allows you to additionally to your logo display the Logo of your customer, agency network or other. Either on the left or right see 9.
- Color Hex Code (Background): Changes the color code of your table on the second page. Please enter the color in hexadecimal. Also refer to 26.
- Show Signature Block on Proposal: Defines if the signature block is displayed by Document Type Proposal
- Show Signature Block OrderConfirmation: Defines if the signature block is displayed by Document Type Order Confirmation
- Show Signature Block on Cancellation: Defines if the signature block is displayed by Document Type Cancellation
- Hide Box (Technical Specifications): Hides the box with Technical Specifications
- Color Hex Code (Table Header): Changes the color code of your table headers on the second page. Please enter the color in hexadecimal. Also refer to 21.
1.2.1 Second Section

The field on the bottom part are used for the following settings:
- Hide Info Table (Cover Letter): Hide the info table on the cover page. For more information read this 7.5.1.4 Customize the Info Table for the PDF Cover Letter
- If you don't hide the info table and you have enabled the cover letter use these fields to define what data is shown in the info table on the first page. (Version 2.82 and up: Make sure to not add the "Valid Until" field here as otherwise you duplicate it on the document)
- Define who to send the cover letter to.
- The four fields define the four columns above your media campaign table on the second page. You don't have to use all four.

- If you are using Packages
- Hide Package Header Details on PDF: When this setting is activated, Advendio hides everything in the line of the Package Header except name, from and until date, booking quantity and the final amount (N1, N2 or N3 depending on AE and TPC. Attention: N2 will be hidden when there is no AE)
- Hide Package Component Details (Fields): If you like to hides ALL components from your customers, set this directly in the Campaign Item (see 3.6 Packages for more information). But if you want to show the package components but hide certain fields from them, please activate this checkbox.
- In this list you can define which fields should be hidden for package components in the PDF. Please see the table below for more information.

- Link here to your custom labels to configure the Footer on the cover letter. More information here 7.2.6 Configure Legal Entities
- Link here to your custom labels if you are using a Full Size Footer on your proposal. More information here 7.2.6 Configure Legal Entities
- Link here to your custom labels if you are splitting your Footer in Middle Data on your proposal. More information here 7.2.6 Configure Legal Entities
- Link here to your custom labels if you are splitting your Footer in Left Side Data on your proposal.More information here 7.2.6 Configure Legal Entities
- Link here to your custom labels if you are splitting your Footer in Right Side Data on your proposal. More information here 7.2.6 Configure Legal Entities
Click Save to complete the creation or editing of the proposal layout.
Please note
- Text fields displayed in this screenshot will not be displayed in your quote because they are overwritten by the custom labels mentioned below.
- If in your line items the agency commission (AC)
- checkbox is TRUE, AC and N2 are displayed at the Campaign Item section at the PDF.
- If the checkbox is false this columns get hidden.
- But the overall N2 is always displayed at the first cover page of the PDF as well as the amount calculation below the campaign Items table.
2. Field List for Package Components

To hide certain fields for package components they have to be entered as line-separated list. The fields need to be written like in the table below, to be recognized by the system. If you don't enter any fields in the list, the following default fields will always be hidden for package components:
- Sales Price
- Amount
- Quantity Discount
- Customer Discount
- Agency Discount
- Special Discount
- Amount net
- Agency Commission (%)
- Amount net/net
- eCPM
- additional fees
Here is a list of all possible fields and what text string needs to be entered for them to be hidden:
| Field | API_Name | What you need to enter |
|---|---|---|
| Sales Price | ADvendio__Sales_Price__c | salesprice |
| Amount | ADvendio__Amount__c | amount |
| Quantity Discount | ADvendio__Rate_Discount_1__c | ratediscount1 |
| Customer Discount | ADvendio__Rate_Discount_2__c | ratediscount2 |
| Agency Discount | ADvendio__Rate_Discount_3__c | ratediscount3 |
| Special Discount | ADvendio__Rate_Discount_4__c | ratediscount4 |
| Amount net | ADvendio__Amount_net__c | amountnet |
| Agency Commission (% | ADvendio__Agency_Commission__c | agencycommission |
| Amount net/net | ADvendio__Amount_net_net__c | amountnetnet |
| eCPM | ADvendio__eCPM__c | ecpm |
| Additional Fees / Surcharges | Summary of multiple fields | addfees |
| Position Number | ADvendio__PositionNumber__c | position |
| Ad Spec → Site | ADvendio__Ad_Spec__r.ADvendio__Site__c | site |
| Ad Spec → Placement | ADvendio__Ad_Spec__r.ADvendio__Placement__c | placement |
| Ad Spec → Ad Type | ADvendio__Ad_Spec__r.ADvendio__Ad_Type__c | adtype |
| Campaign Item Name | Name | name |
| Ad Spec → Description on PDF | ADvendio__DescriptionOnPDF__c | adprice.adspec.descriptiononpdf |
| Frequency Capping | Summary of multiple fields | fc |
| Technical Targeting Information | Summary of multiple fields | technicaltargeting |
| AdHourOfDay & AdDayOfWeek | ADvendio__AdHourOfDay__c & ADvendio__AdDayOfWeek__c | timetargeting |
| Geo Targeting Information | Summary of multiple fields | geotargeting |
| Ad Key Values | ADvendio__AdKeyValues__c | adkeyvalues |
| Selected Content Information | ADvendio__SelectedContentInformation__c | selectedcontentinformation |
| Selected Publication Date Information | ADvendio__SelectedPublicationDateInformation__c | publicationdatetargeting |
| Third Party Commission | ADvendio__Third_party_commission__c | thirdpartycommission |
| Amount Net3 | ADvendio__Amount_net3__c | amountnet3 |
| From Date | ADvendio__from_Date__c | fromdate |
| Until Date | ADvendio__until_Date__c | untildate |
| Billing Category | ADvendio__Billing_category__c | billingcategory |
| Quantity | ADvendio__Quantity__c | quantity |
| Guaranteed AI | ADvendio__Guaranteed_AI__c | guaranteedai |
| Line Description | ADvendio__LineDescription__c | linedescription |
Notice that the text string might not be equal to either label or API name of the field.
3. Edit Quote Template Labels

Click on your name displayed in the top right-hand corner. Select the Setup menu (1).
There go to Custom Labels under Create (2).
3.1 Open Label

For your proposals and order confirmations, you are able to adapt any custom label. For editing the proposal layout, customize the labels called assigned to the category Standard Quote, e.g. Conditions of Payment Text, Technical Specifications and Delivery Advertising Medium.
Open one of them with a click on the label's name.
3.2 Create New Local Translations / Overrides

Click the button New Local Translations / Overrides.
3.3 Enter Text
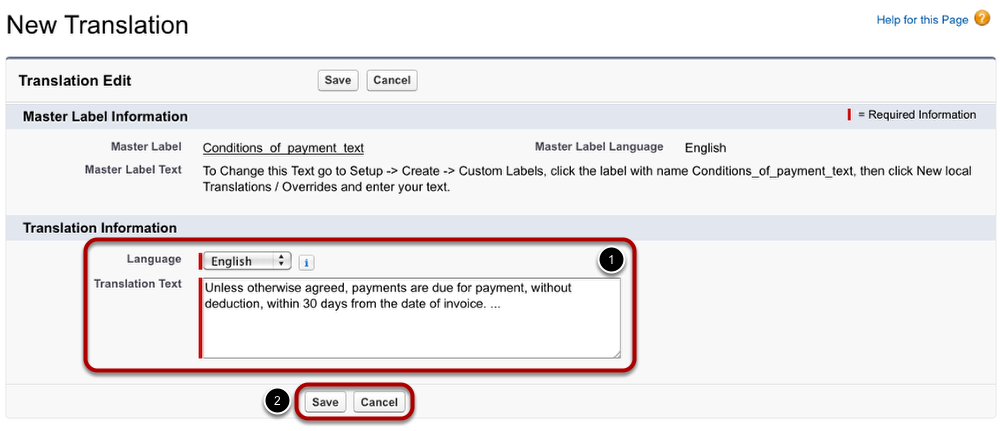
Choose a language from the pick-list. Only those languages activated in the translation workbench without an existing translation for this label are available. Enter the text in the field Translation Text (1). Then click Save (2).
Repeat the last three steps with the all needed labels if necessary.
Please note: Some of the labels are html enabled. If you want to insert a break in the label's translation text, please enter <br>. To clear these html enabled text fields, enter " ".