Platform 161, with its headquarters in Amsterdam, is a DSP for advertisers, agencies and publishers.
In order to connect you have to install an extention to ADvendio. Please ask you ADvendio consultant for the sandbox and production links.
The following features are covered in this installation:
General Information: The ADvendio Platform161 integration is currently using API version v3 |
Please take a look at this page to find our latest installation links for the extension: ADvendio Package Extensions.


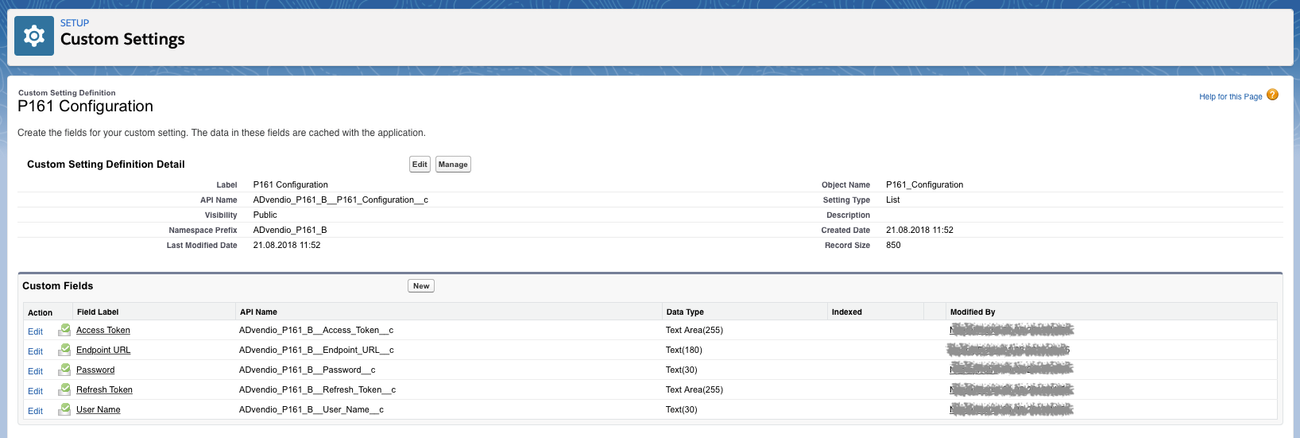
Please create only one configuration setting per Org to prevent problems in the usage. We recommend to generally use a Salesforce sandbox for testing and set the Enpoint URL to testing environment and later in you Salesforce production, use the Endpoint URL for productive P161 network. |
and show the field “P161 Id”
and drag the Lightning action “Push to P161” to the section “Salesforce Mobile and Lightning Experience Actions”
Note: There are some mandatory fields in the Platform161 API, which should be made mandatory in ADvendio as well. The fields are:
| Object | Field label (Field Name) |
|---|---|
| Account | Website (Website) |
| Media Campaign | Budget (ADvendio__Budget__c) |
| Media Campaign | Campaign Start Date (ADvendio__Campaign_Start_Date__c) *Campaign Item Start and End date will be filled automatically by ADvendio, once a Campaign Item is created |
| Media Campaign | Campaign End Date (ADvendio__Campaign_End_Date__c) *Campaign Item Start and End date will be filled automatically by ADvendio, once a Campaign Item is created |
When a push to Platform161 was successful the following fields are populated in ADvendio:
| Object | Field label (Field Name) |
|---|---|
| Account | P161 Id (ADvendio_P161_B__P161_Id__c) |
| Media Campaign | Alternate Order Id (ADvendio__AlternateOrderId__c) |
| Campaign Item | Ad Id (ADvendio__Ad_Id__c) |
With version 1.1 we now enable you to set Inventory Sources for your Campaigns and push them to Platform161. Please follow these steps, to configure your system:
1.) Go to Setup → Object Manager → AdServer IDs; For the field type, please add a new picklist value with the following API-Name: "inventory_source". Feel free to use any Label you like, the label is what will be shown to the user in the UI
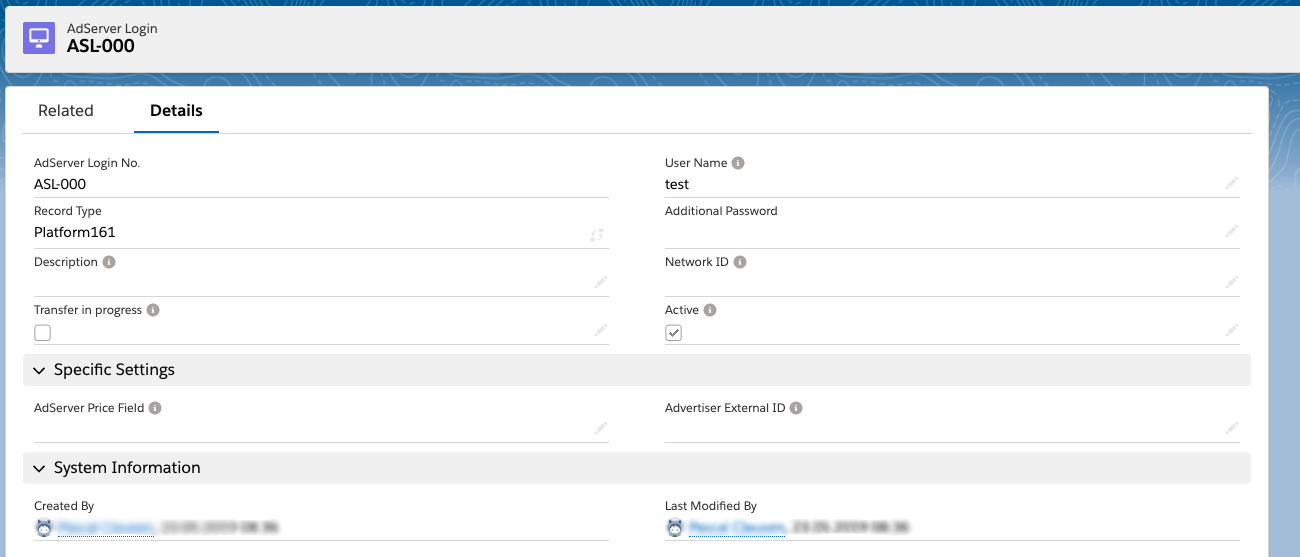
2.) OPTIONAL: Create an AdServer Login for your Platform 161 data. This step is not required, but makes it easier to manage your data and will be necessary if you want to select Inventory Sources directly in the Media Configuration.

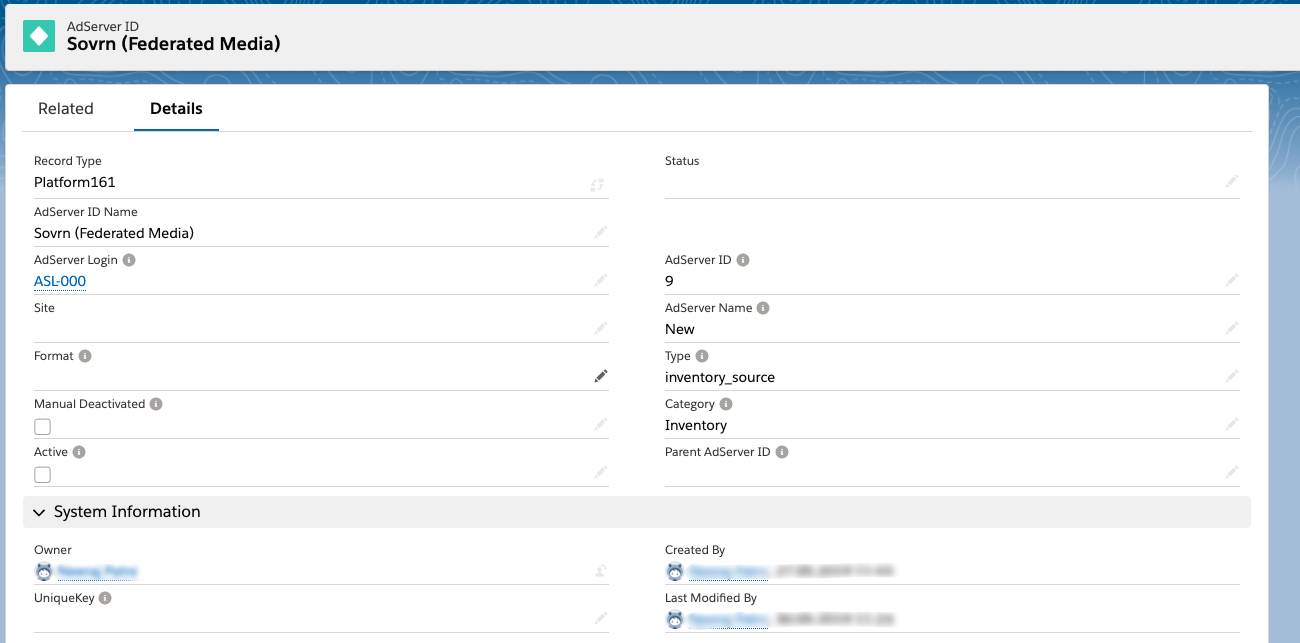
3.) Import your Inventory Sources into ADvendio. You can for example create a csv with the required data, which you can then import into your Org, or if there are not many Inventory Sources needed, you could also create them manually. Please make sure to use the following mapping:
| ADvendio Field | Needed Information / P161 Field |
|---|---|
| AdServer ID | the ID of the inventory source in Platform161 |
| AdServer ID Name / AdServer Name | the name of the inventory source in Platform161 |
| Type | inventory_source |
| Category | Inventory |
| Active | true |
| AdServer Login | the record ID of the AdServer Login created in step 2.), if you didn't do this, just leave empty |
| Record Type | Use the ID of the Record Type you created in step 2.) for AdServer IDs, if you didn't create an own one, just use DFP |

4.) Import your Direct Deals into ADvendio. You can for example create a csv with the required data, which you can then import into your Org, or if there are not many Inventory Sources needed, you could also create them manually. Please make sure to use the following mapping:
| ADvendio Field | Needed Information / P161 Field |
|---|---|
| AdServer ID | the ID of the Direct Deal in Platform161, please make sure to use the actual Platform161 ID and not the Deal ID |
| AdServer ID Name / AdServer Name | the name of the Direct Deal in Platform161 |
| Type | direct_deal |
| Category | Inventory |
| Active | true |
| AdServer Login | the record ID of the AdServer Login created in step 2.), if you didn't do this, just leave empty |
| Record Type | Use the ID of the Record Type you created in step 2.) for AdServer IDs, if you didn't create an own one, just use DFP |
5.) If you want your users to directly select Inventory Sources or Direct Deals for Campaign Items in the Media Configuration, make sure the field Targetings → Inventory Targeting is part of your Tab Setup and visible in the Media Configuration.
Available with version 1.4 of ADvendio Platform161 Connect |
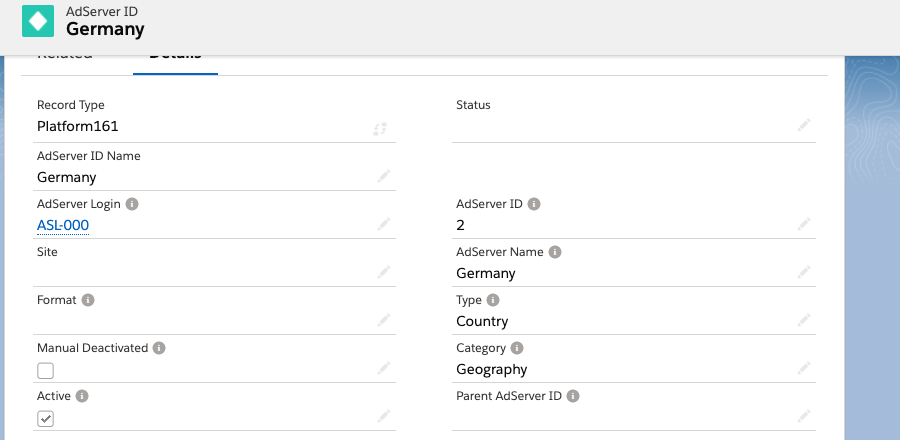
Similar to the Inventory Source and Direct Deals, you are able to use AdServer IDs to handle geo targeting. At the moment it's possible to configure Country, Region and City Targeting and submit it to Platform161. In order to do so, you need the AdServer IDs. To be ready to use them you will need the names and the IDs from Platform161 for either your Countries, Regions or Cities you want to target. For additional support to access those information, please contact the support of Platform161. Ideal would be a list in csv format, as you can easily import it into Salesforce.

For countries, please use the following field mapping:
| ADvendio Field | Needed Information / P161 Field |
|---|---|
| AdServer ID | the ID of the country in P161 |
| AdServer ID Name / AdServer Name | the name of the country (note this will be visible in the selection screen in ADvendio, you don't need to use technical names as the ID will be used to be sent to P161) |
| Type | Country |
| Category | Geography |
| Active | true |
| AdServer Login | the record ID of the AdServer Login created in step 2.), if you didn't do this, just leave empty |
| Record Type | Use the ID of the Record Type you created in step 2.) for AdServer IDs, if you didn't create an own one, just use DFP |
For regions, please use the following field mapping:
| ADvendio Field | Needed Information / P161 Field |
|---|---|
| AdServer ID | the ID of the region in P161 |
| AdServer ID Name / AdServer Name | the name of the region (note this will be visible in the selection screen in ADvendio, you don't need to use technical names as the ID will be used to be sent to P161) |
| Type | Region |
| Category | Geography |
| Active | true |
| AdServer Login | the record ID of the AdServer Login created in step 2.), if you didn't do this, just leave empty |
| Record Type | Use the ID of the Record Type you created in step 2.) for AdServer IDs, if you didn't create an own one, just use DFP |
| Parent AdServer ID | OPTIONAL If you like you can link the Salesforce Record IDs of Countries to enable a hierarch within ADvendio. This was during targeting selection, you will be able to see regions below the countries. This requires that the import of countries is already done, in order to have Salesforce Record IDs to refer to. |
For cities, please use the following field mapping:
| ADvendio Field | Needed Information / P161 Field |
|---|---|
| AdServer ID | the ID of the city in P161 |
| AdServer ID Name / AdServer Name | the name of the city (note this will be visible in the selection screen in ADvendio, you don't need to use technical names as the ID will be used to be sent to P161) |
| Type | City |
| Category | Geography |
| Active | true |
| AdServer Login | the record ID of the AdServer Login created in step 2.), if you didn't do this, just leave empty |
| Record Type | Use the ID of the Record Type you created in step 2.) for AdServer IDs, if you didn't create an own one, just use DFP |
| Parent AdServer ID | OPTIONAL As with regions, you can enter a country or a region Salesforce Record ID into this field, to display the cities in hierarchy. This requires that the import of countries/regions is already done, in order to have Salesforce Record IDs to refer to. |
To push Campaigns to Platform161 you will need to create Campaign Items. In the current version, all relevant information are directly set at the Campaign Item, thus you could in theory use every Ad Price in your Org (as long as it's CPM) to create these Platform161 Campaign Items. However we recommend that you create your own inventory for this and use the Platform161 Record Types we provide with our managed package extension.
You will need:
Please make sure, that all your Ad Prices are using the CPM Billing Category, as this is current the only one we support for Platform161. Else there will be a mismatch between your ADvendio and Platform161 data. |