Mass Ad Spec Creation
...
- 3.2 Ad Spec & Rates Manager
- 3.7 How to create and manage Contents? (Content Wizard Lightning)
- 3.3.3 Create and Update Rates Wizard
- 3.6.2 Package Manager
...
With the Inventory & Rates Manager, we make it easier to generate new Ad Specs that contain all the information you need for an unambiguous specification, including pricing information. When using the ad server integration it's necessary to connect the ad spec database in ADvendio with the ad spec database in the ad server. Each ad spec in the ad server environment has an individual ID, which has to be assigned to the according ad spec in the ADvendio environment in order to connect them with each other.
Table of Contents
1. Overview
Every Ad Spec consists of three objects or components:
...
The Inventory & Rates Manager helps you to create your ad specs and therefore products.
Navigate to the Overview App Launcher and open the Inventory & Rates Manager:
- Go to the All Tabs menu (+) and navigate to Overview.
- Navigate to the section Inventory Management and expand it.
- Click the button Inventory App Launcher.
- Look for the Inventory & Rates Manager.
The Inventory & Rates Manager guides you through five different steps:
- Create all necessary components like Medium/Sites, Placements, Ad Types or Rate Categories.
- Assign your Ad Types to your Medium/Sites.
- Create Ad Specs based on your created and already existing inventory.
- Create Ad Prices for your Ad Specs as well as graduated prices.
- Connect your Ad Specs with your Ad Server IDs.
Note: Records will be created or updated, none will be deleted. Creating an Ad Spec in ADvendio does not result in the creation of an identical Ad Spec in your Ad Server.
To improve the usability of updating records a popup will be shown that asks for a confirmation to update an existing record, similar to this:

2. Create Objects - Components Step 1
The first step supports you in creating Medium/Sites, Rate Categories, Placements and Ad Types.
...
- Enter all mandatory fields like Rate Category Name.
- Enter other optional fields.
- Add a new row to create more Rate Categories.
- Click the button Save.
...
Note: The System Administrator is able to edit the Page Layout. If there is any field missing, the System Administrator is able to drag it into the page layout.
3. Assignment Step 2
The second step lets you assign the Ad Types to a Medium or Site. You need to do this in order to choose which Ad Types will be shown for your Sites in Step 3 Creation.
...
- Select a Medium/Site to assign all corresponding Ad Types.
- Select all Ad Types that belongs to this Medium/Site.
- Click the button Save to create the assignment.
- Repeat step 1 to 3 to assign other Ad Types that belongs to a Medium/Site.
- Click the button Next to go on to the next step.
Note: Records will be created or updated, none will be deleted.
| Info |
|---|
The Site / Ad Type assignments will only be used by the Inventory & Rates Manager, there will be no influence on any other ADvendio features. |
...
| Info |
|---|
| A new Ad Spec is created for every combination. |
Note: Records will be created or updated, none will be deleted.
5. Rates Step 4
The fourth step supports you to create Ad Prices for your products.

Select your Ad Specs and create Ad Prices:
...
You are also able to create Graduated Prices for your Ad Specs. Click the small Graduated Prices icon next to the field List Price and enter your ranges (From, Up to, Rate).
Note: Records will be created or updated, none will be deleted.
6. AdServer ID - Ad Spec - Assignment Step 5 (Mandatory for digital only)
The last step supports you with assigning Ad Server IDs to existing Ad Specs if you are using the ad server connection.
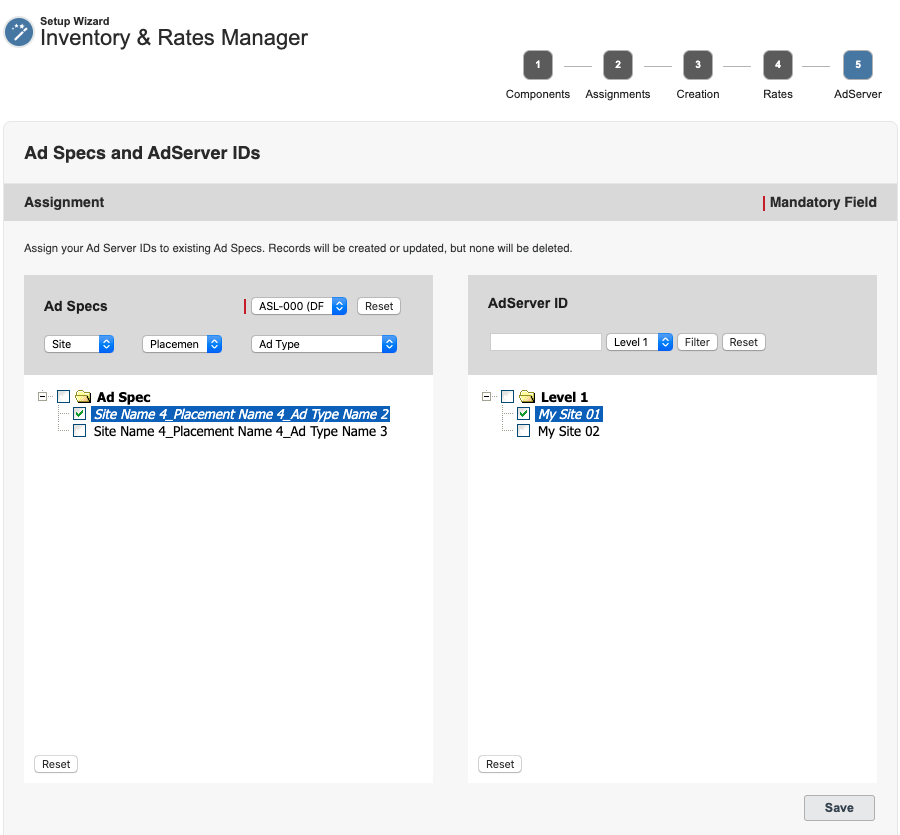
Assign Ad Server IDs to your existing Ad Specs:
...
| Info |
|---|
| You can skip and step or directly click on the number to later edit data. Records will be created or updated, none will be deleted. |