The Booking Calendar assists you to easily handle exclusive placements. An exclusive placement blocks other ad types, it’s important to check thoroughly if a booking is possible to prevent double bookings. With the help of the Booking Calendar, booked, offered, and available exclusive placements are visualized to give you a better overview of what is available or not.
Here you find how to use the 4.9 Booking Calendar.
A. Prerequisites
1. Add Remote Site Settings
In order to use the Booking Calendar, you need to configure a remote site setting. This setting allows the Booking Calendar to load data records.
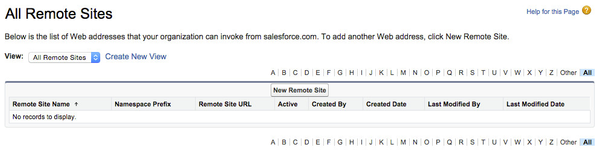
Please navigate to remote site settings and enter the url from the Booking Calendar Wizard:
- Navigate to Setup.
- Expand the section Security Controls.
- Click the link Remote Site Settings.
- Click the button New Remote Site.
- Enter the Remote Site Name, for instance, enter "PositionChart".
- Enter the Remote Site URL displayed at the Booking Calendar Wizard (it will look like this: "https://advendio.XXX.visual.force.com").
- Please activate the Checkbox Active.
- Click the button Save.
After creating this remote site setting the warning message should not appear anymore.
2. Prepare your Inventory - Ad Price and Campaign Item Fields
The Booking Calendar can only show Ad Prices and compare them with offered or booked Campaign Items, that are marked as "exclusive".
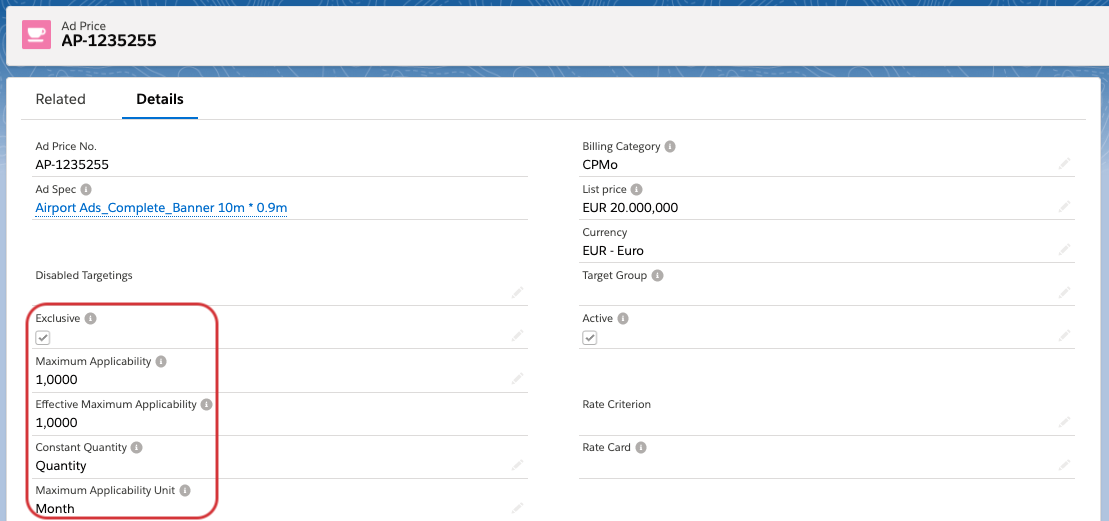
The following fields are used by the Booking Calendar:
- Exclusive: This Ad price is exclusive. Only exclusive items are displayed in the Booking Calendar. The exclusive checkbox is automatically set for new campaign items while creating them.
- Maximum Applicability: This field defines how often the item is available. This field is available in the object Ad Price and also in the object Ad Specs. If empty the Booking Calendar and Check Availability will assume a 1.
- Effective Maximum Applicability: This field defines how often the item is available. If the field Maximum Applicability in the Ad Price is empty, the field Maximum Applicability in the Ad Spec is used. If both fields are empty, the Booking Calendar interprets this as "1".
- Constant Quantity: This field defines if the Booking Calendar should count the Quantity, Guaranteed AI, Runtime Campaign Item or the Frequency. If this field is not defined, the default value is "Quantity".
- Maximum Applicability Unit: This field defines if the Booking Calendar is using this Ad Price per Day, Week, Month, Quarter, Year. The Booked Quantity of Campaign Items will then be divided amongst the days, weeks, months, quarters, or years. (Please see table below)
Attention:
- If any of these values are missing add them to the respective picklists.
- Ad Prices with a Maximum Applicability Unit of week, month, quarter, or year will only appear if the time column in the Booking Calendar is set to same or a larger time frame and not in the day-view.
- You can also define the above values on the Content and AdSpec Object. (If fields are not visible, please edit the corresponding page layout.)
- Make sure that your Campaign Line Item also has the exclusive checkbox marked. This should work automatically if you pick out an exclusive Ad price but automatically imports or other processes might miss it.
Here you can see which smaller units on your AdSpec are converted and shown in the booking calendar if the following time columns are selected:
| time columns → / max AppUnit | day | week | month | quarter | year |
|---|---|---|---|---|---|
| day | converted | converted | converted | converted | converted |
| week | - | converted | - | - | - |
| month | - | - | converted | converted | converted |
| quarter | - | - | - | converted | converted |
| year | - | - | - | - | converted |
B. Manage your Booking Calendar Settings
In order to use the Booking Calendar, you need to configure remote site settings and create some templates.
Please navigate to the Booking Calendar Wizard:
- Navigate to Overview.
- Scroll down and open the section Setup & Settings.
- Click the button Booking Calendar Settings.
The Booking Calendar Settings helps you to manage your templates. Templates are used to define which filters and fields a user can see.
Note: If you run the Booking Calendar the first time, you will see a warning message. Please copy the site url and create a remote site setting:
1. Create Templates
In order to use the Booking Calendar, you need to configure a template. Optionally you can use the ADvendio default templates or modify those.
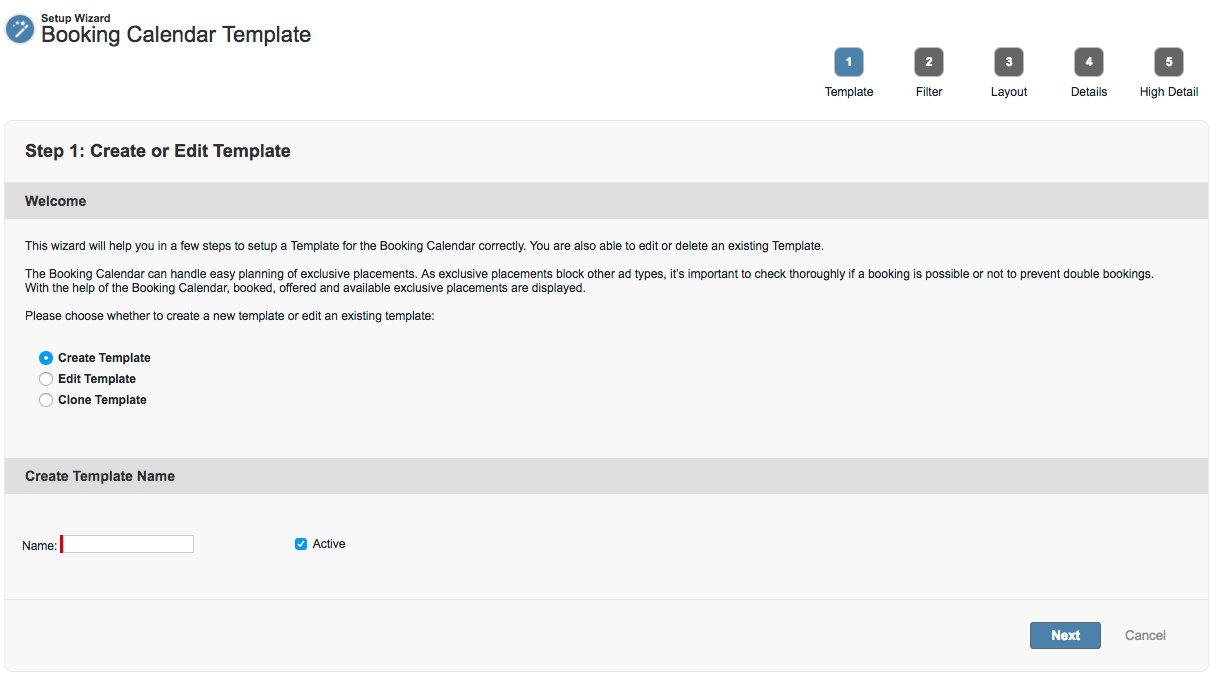
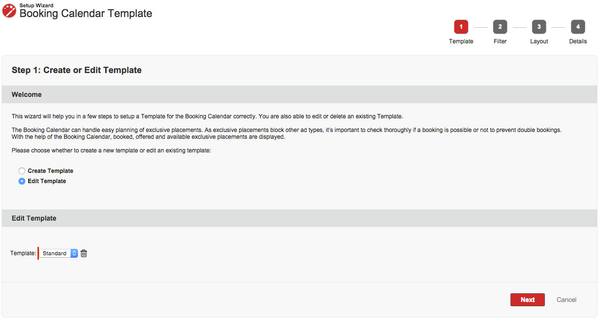
1. Select Template
Please navigate to the Booking Calendar Wizard and create a new template:
- Navigate to Overview.
- Scroll down and open the section Setup & Settings.
- Click the button Booking Calendar Settings.
- Select the button Create Template.
- Enter a Name for this template, for instance, use "Standard" as default.
- Click the button Next.
If you have defined a name for the template, you are able to define filter fields, pre-fill filters, define layout columns and detailed information (campaign item data).
2a. Select Filters (Search Page)
Filters allow you to search for specific sites, placements or ad types if you defined those filters. You are able to define various filters like billing category or price lists. The system has automatically defined filters that are used most frequently.
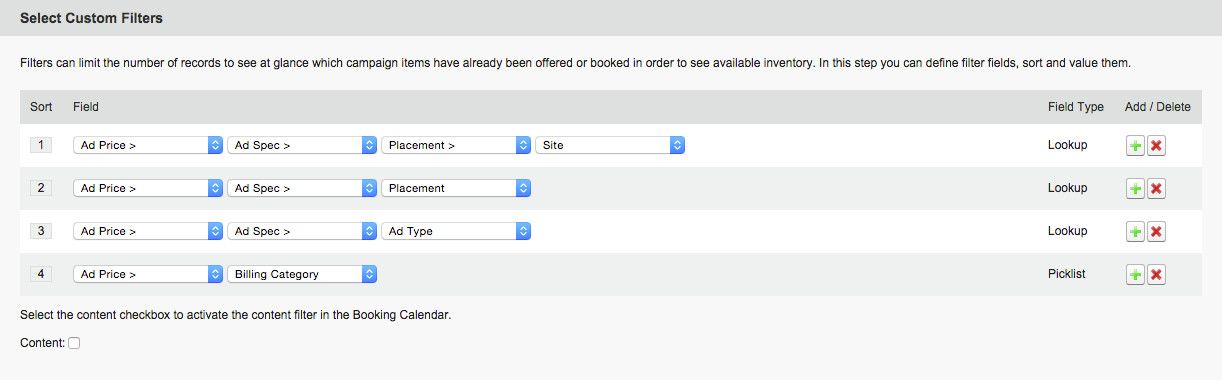
You can add filters from different objects (any linked objects, start is Campaign Item) like you would add fields to a formula field:
- Click the Plus-Icon to add a new line.
- Click the Delete-Icon to delete an existing line.
- Click and hold clicked the Sort-Icon and drag and drop the line to sort your filters.
- Select a field from the picklist to insert that field as a filter.
- Select a lookup from the picklist to jump to another object to insert a field as a filter.
All fields are automatically added to the section below.
2b. Predefined Filters and default values
Filters allow you to search for specific sites, placements or ad types if you define those filters. You are able to predefine filters by selecting a template.
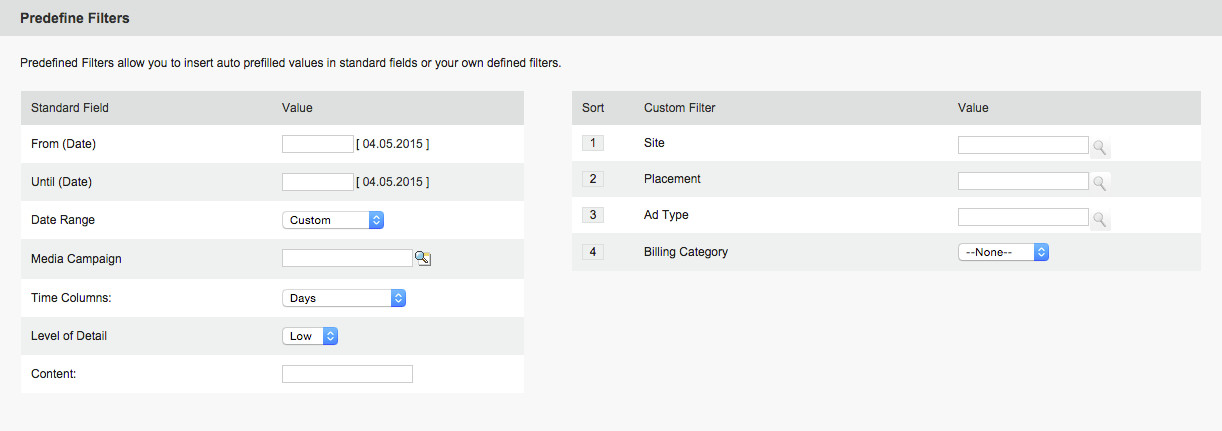
You are able to predefine filters while selecting a template that filters the results of the Booking Calendar:
Standard Fields
- From Date: Enter a date to this field. This field is automatically filled with the date while selecting this template.
- Until Date: Enter a date to this field. This field is automatically filled with the date while selecting this template.
- Date Range: Define a date range (Custom, Today, Tomorrow, This Week, Next 7 Days) to define which time frame should be displayed in the Booking Calendar.
- Media Campaign: Define a standard media campaign that always should be used.
- Time Columns: Define which unit of time (days, weeks, months, quarters, years or publication dates) should be used in this template.
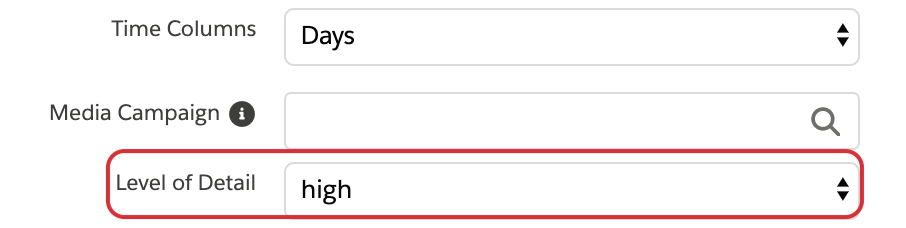
- Level of Detail: Standard is low, if you want to see more details directly into the Booking Calendar, you are able to set it to high.
- Content: Define a value to filter the Booking Calendar by this Content. You can use a wildcard ("*").
Custom Filters
- Site: Define one or more sites (Multi-Lookup) to filter the Booking Calendar.
- Placement: Define one or more placements (Multi-Lookup) to filter the Booking Calendar.
- Ad Type: Define one or more ad types (Multi-Lookup) to filter the Booking Calendar.
- Billing Category: Define a billing category to see only certain records.
If you have configured all settings you can go to the next step:
- Click the button Next.
Note: If the time frame is too large, the time columns automatically switches to weeks, because the Booking Calendar can not display too much information. Please use filters always to display the results of records that you need.
2c. Expert Mode
Here you can program more advanced filters for your Booking Calendar templates.
As you need an enhanced technical knowledge on how to write queries please ask your ADvendio consultant for more information if you consider using this feature.
Please keep in mind that the OR operator should not be used.
To enable the feature you can just click the checkbox on the upper right corner in the relevant template.
After hitting the checkbox you will see two fields in the layout where you can write your query for Ad Prices and Campaign Items.

The Query for the Ad Price should be starting with an AND and the query for the Campaign Item does not need an operator to start.
Here are two examples:
- SOQL Where Clause Addition (Ad Price): "AND Name = 'AP-1'"
- SOQL Where Clause Addition (Campaign item): "ADvendio__TimeZone__c != 'Europe/Berlin'"
3. Setup Layout (Result Columns)
The columns of the Booking Calendar can be defined to display the information that is necessary. The system has automatically defined columns that are used most frequently.
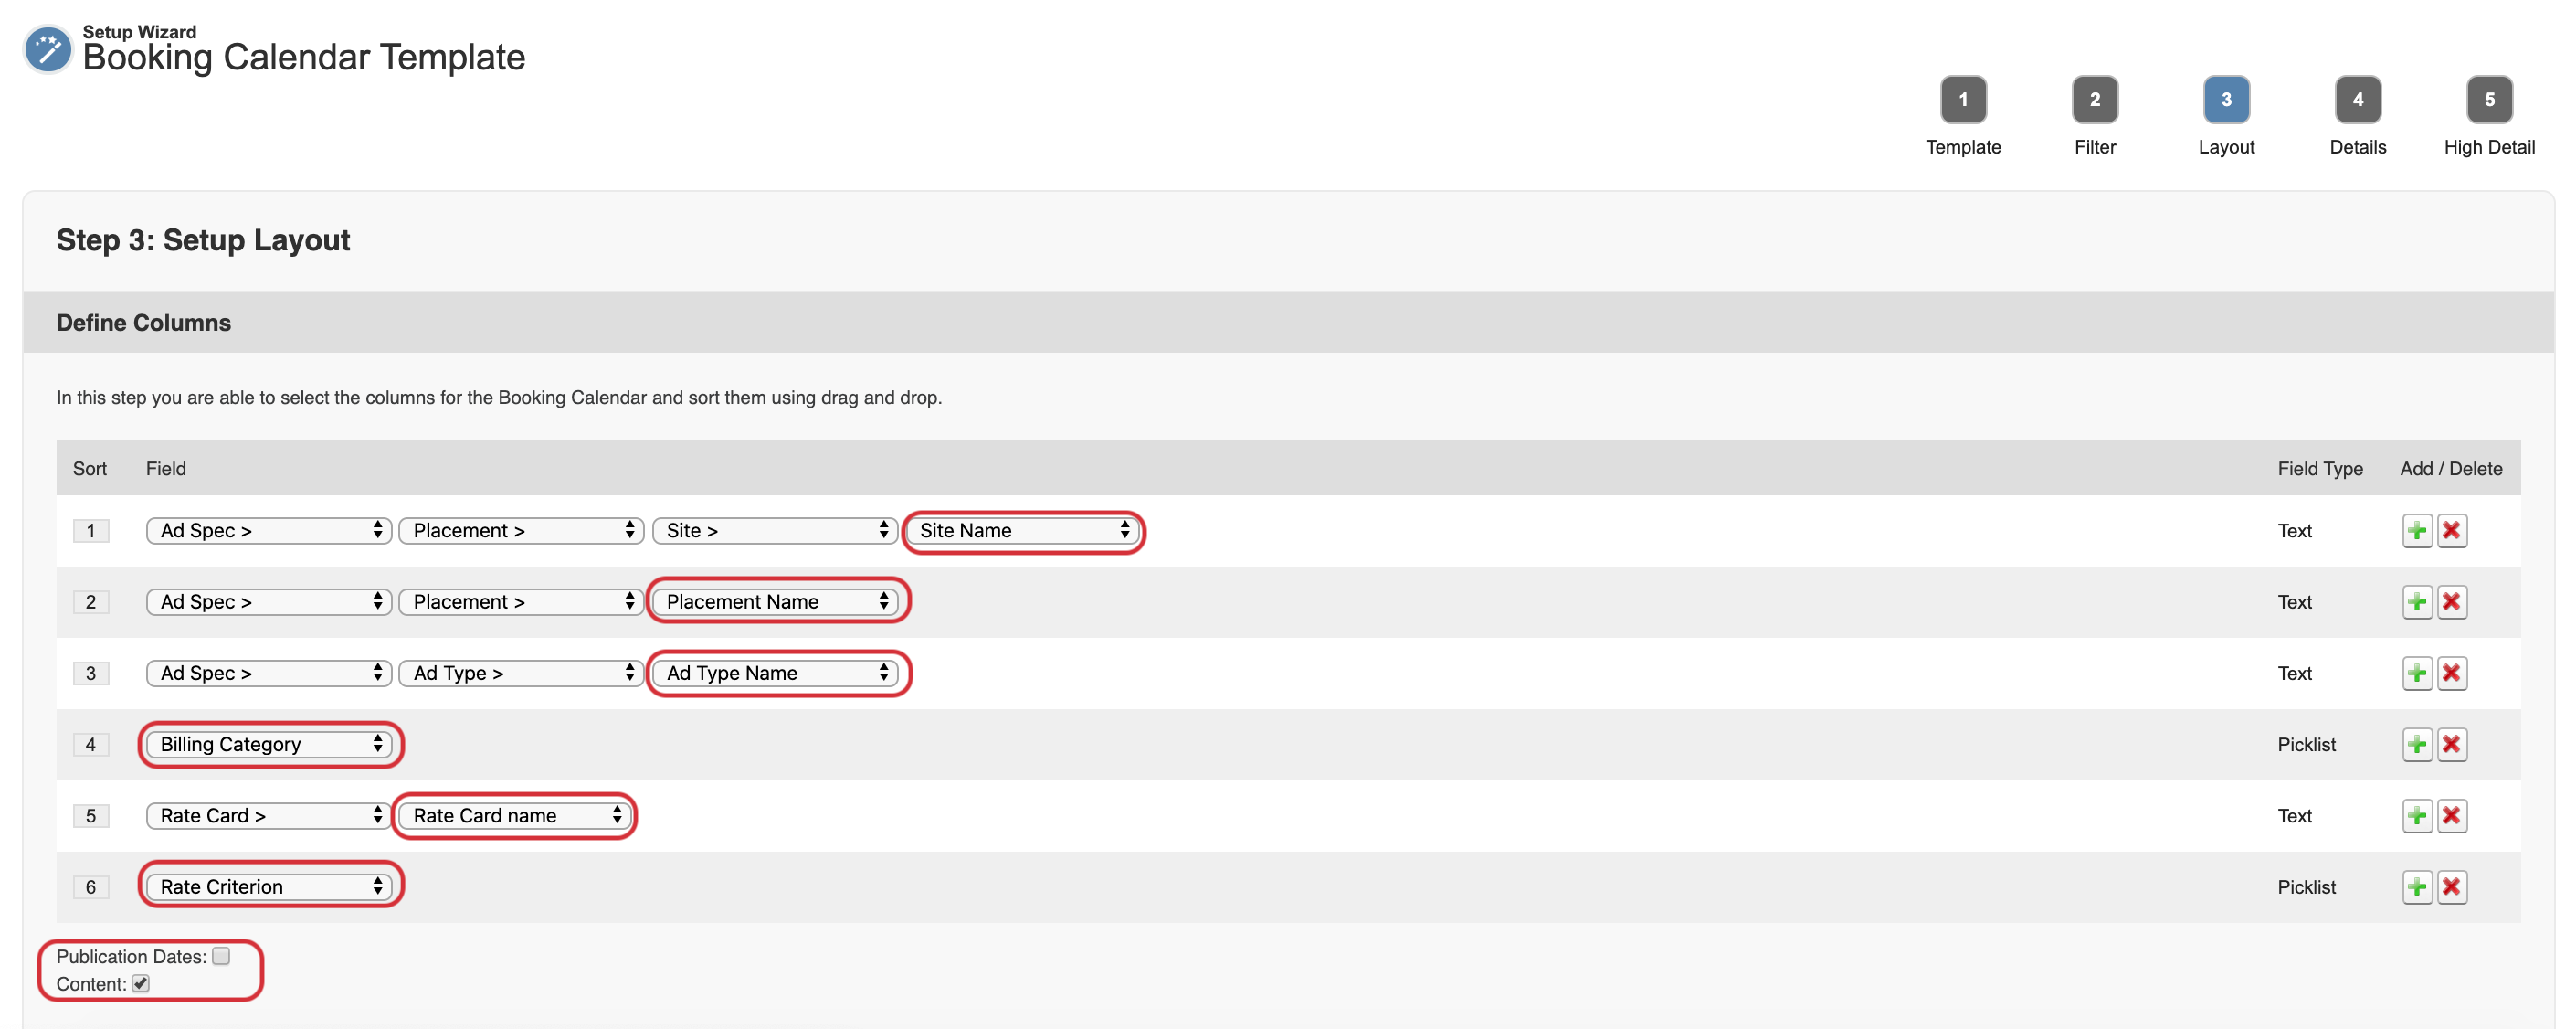
You are able to define columns (any linked objects, start as Campaign Item) like you would add fields to a formula field:
- Click the Plus-Icon to add a new line.
- Click the Delete-Icon to delete an existing line.
- Click and hold clicked the Sort-Icon and drag and drop the line to sort your filters.
- Select a field from the picklist to insert that field as a column.
- Select a lookup from the picklist to jump to another object to insert a field as a column.
- Activate the checkboxes Content and Publication Dates to display the them as a column.
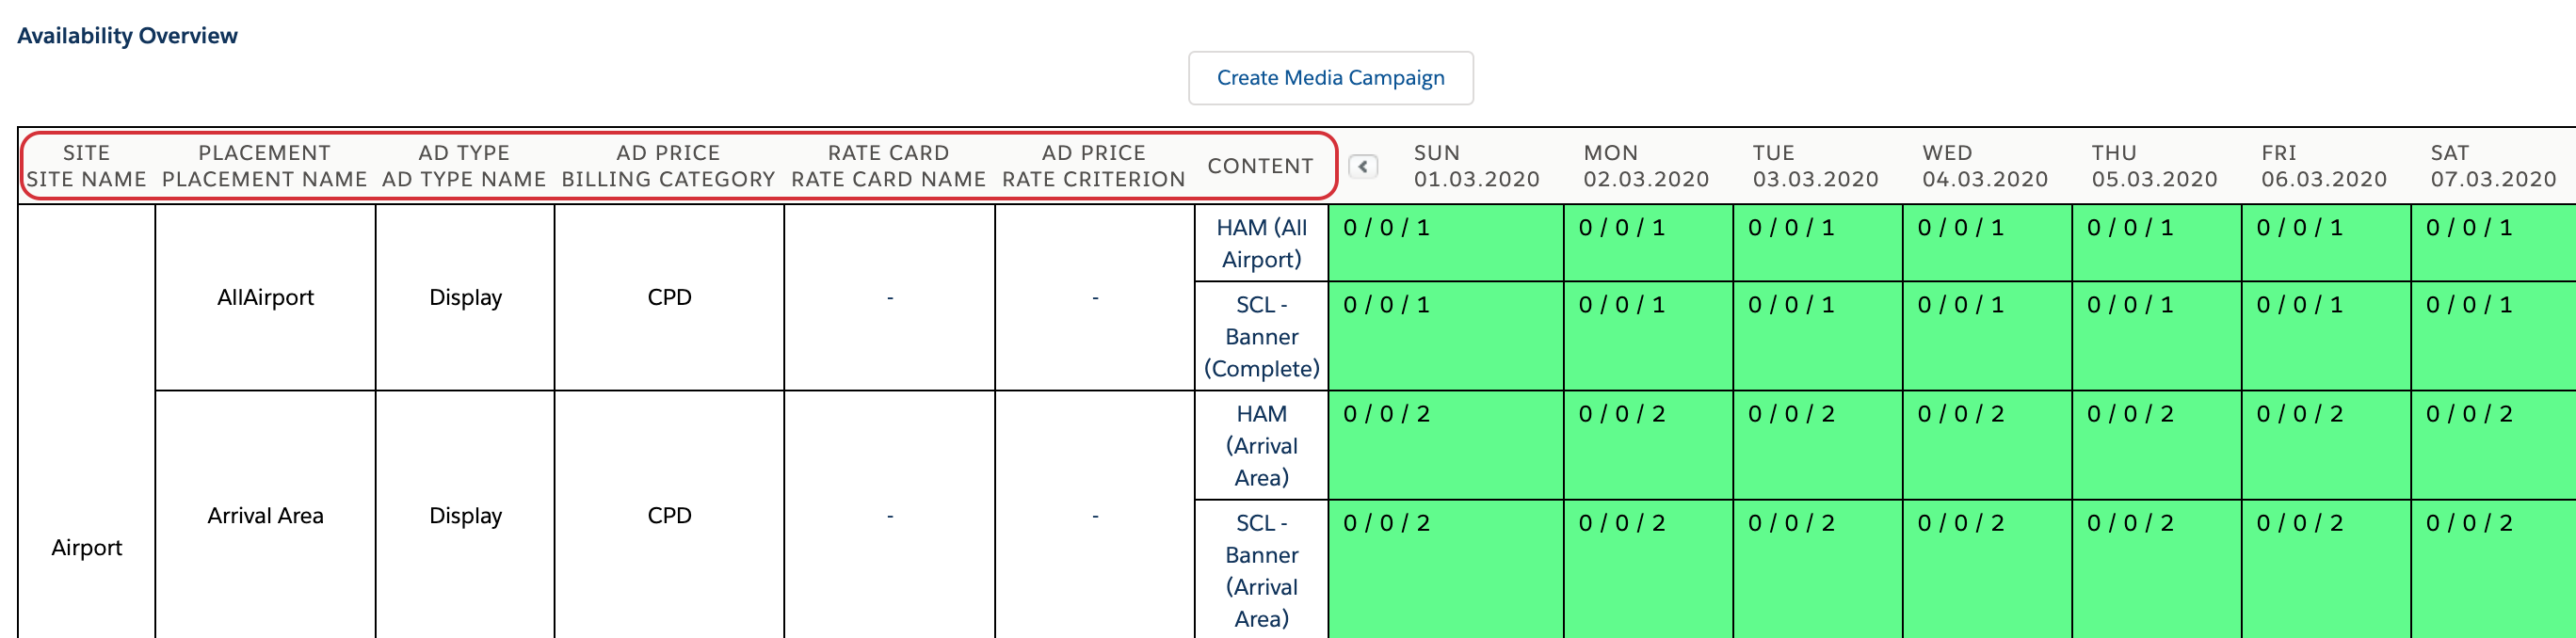
Here is your result for the example above:
If you have configured all settings you can go to the next step:
- Click the button Next.
4. Define Detailed View
The detailed information (campaign item data) of the Booking Calendar can be defined to display the information that is necessary. The system has automatically defined columns that are used most frequently.
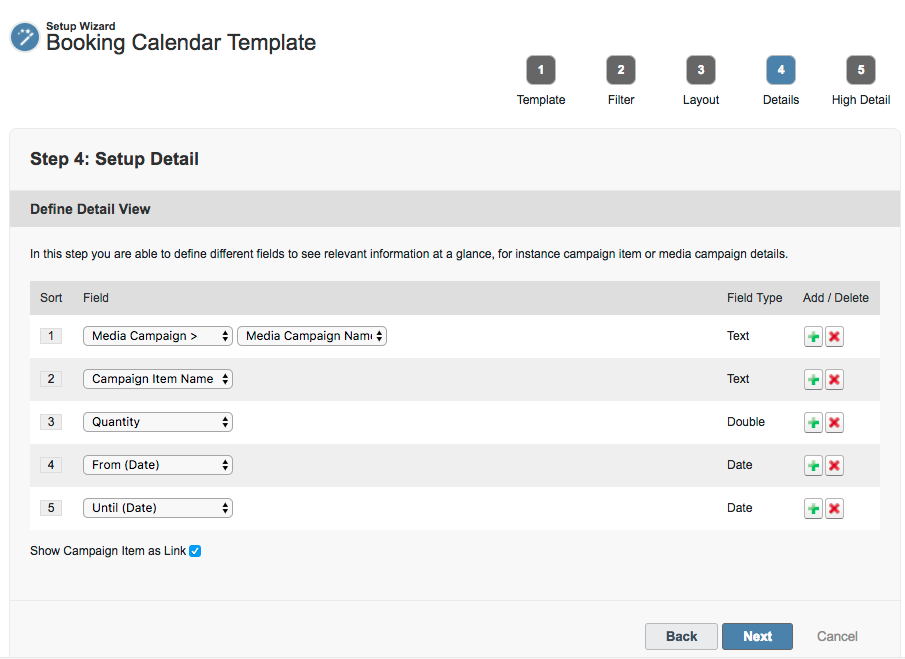
You are able to define columns (any linked objects, start is Campaign Item) like you would add fields to a formula field:
- Click the Plus-Icon to add a new line.
- Click the Delete-Icon to delete an existing line.
- Click and hold clicked the Sort-Icon and drag and drop the line to sort your filters.
- Select a field from the picklist to insert that field as a column.
- Select a lookup from the picklist to jump to another object to insert a field as a column.
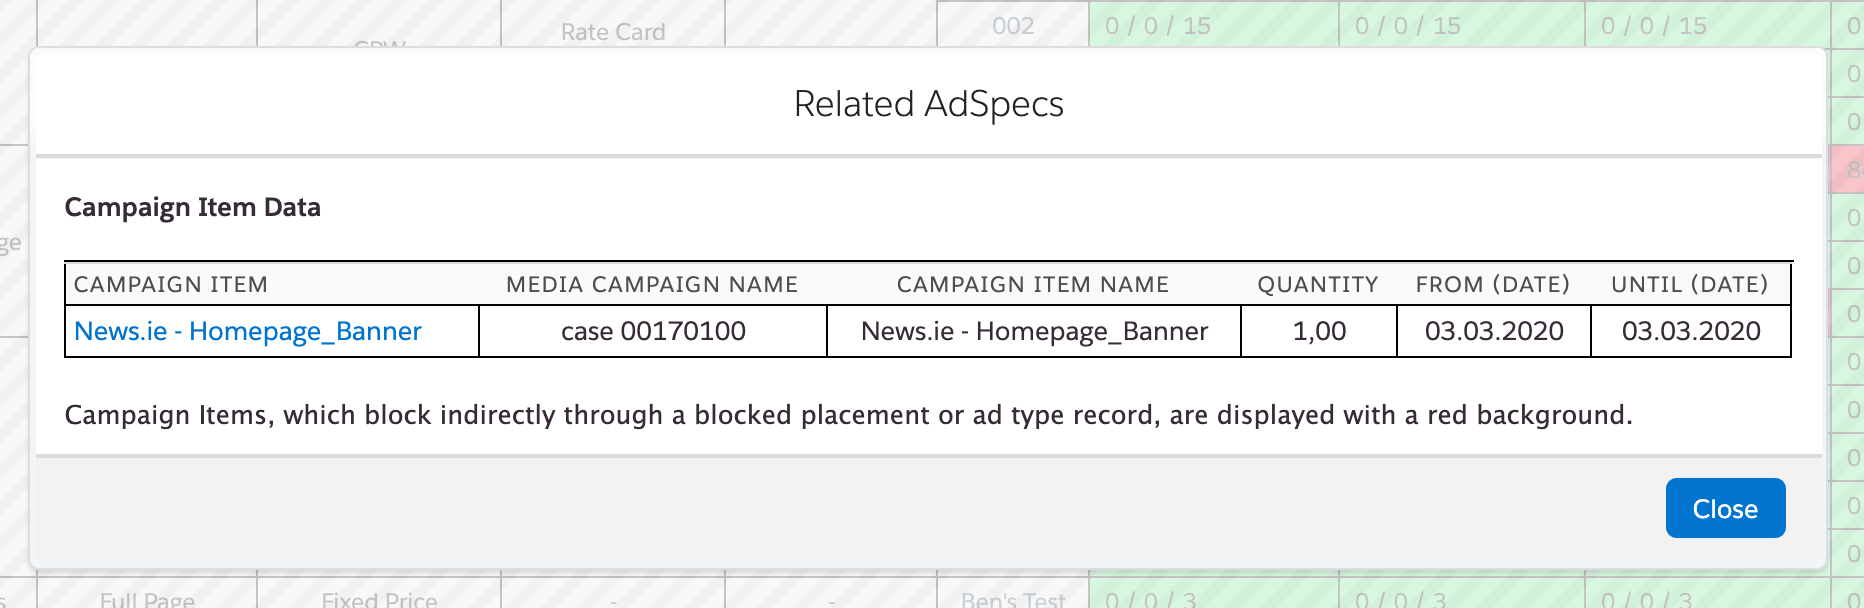
- Activate the checkbox Campaign Item as Link to display the campaign item as a column with a link to the right campaign item.
Here the result info page for the example above (clicking on the little ![]() Button):
Button):
5. High Details
In this step you are able to define different fields you will see when choosing "high" in the filter selection directly in the cell as opposed to step 4 when you click on the little ![]() Button.
Button.
Please choose the for you relevant information to see at a glance, for instance, campaign item or media campaign details.
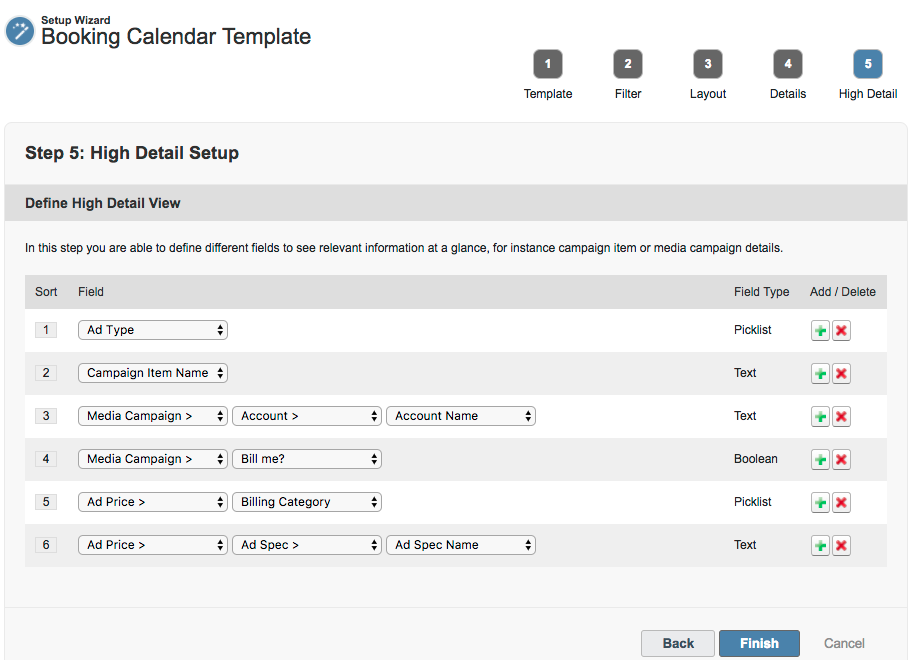
The result can look like this:

If you have configured all settings, you can go to the next step: Click the button Finish.
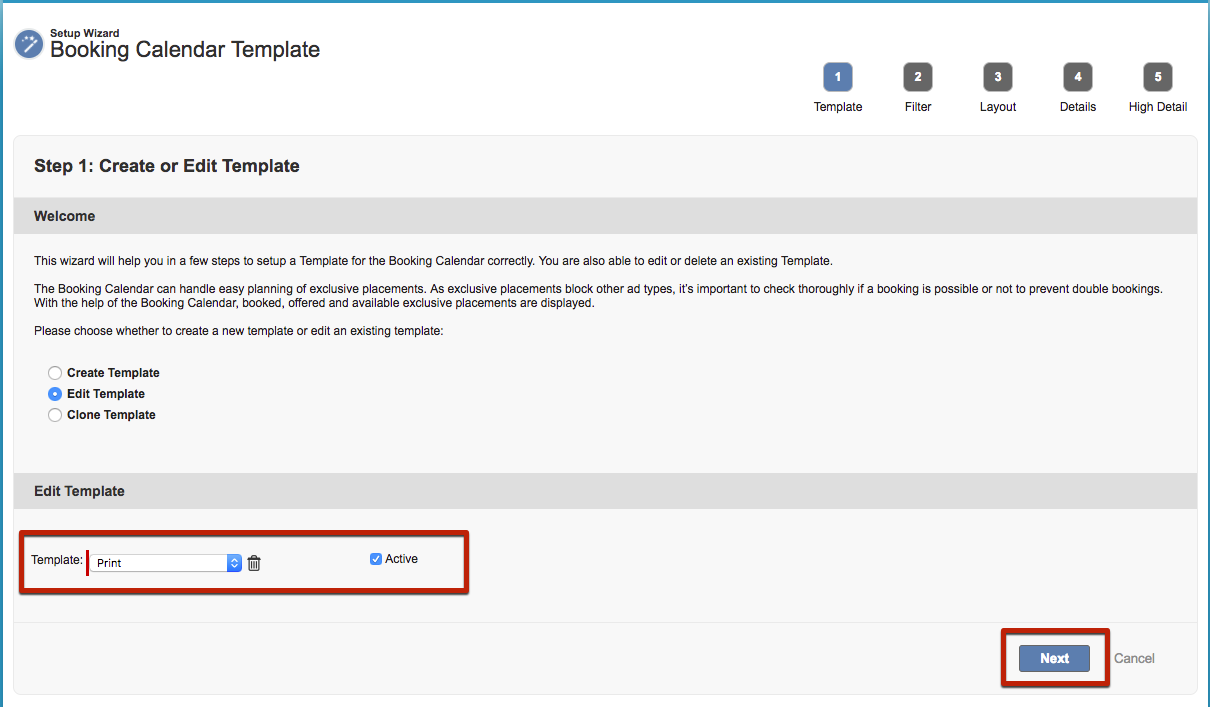
2. Edit or Delete Templates
If you want to edit an existing template or delete a template that is not longer used, you can also use the Booking Calendar Wizard.
Please navigate to the Booking Calendar Wizard and edit an existing template:
- Navigate to Overview.
- Scroll down and open the section Setup & Settings.
- Click the button Booking Calendar Wizard.
- Select the button Edit Template.
You can now select an existing template and edit it or delete that template.
- Click the Button Next to exit this template OR click the Delete-Icon to delete this template.
Activate or Deactivate Templates
Templates can be activated or deactivated. A deactivated template still exists, but it will be hidden in the Booking Calendar.
To deactivate or activate an existing Template go to the Booking Calendar Settings. Click on "Edit Template" and select the Template of your choice. You can then use the Active Checkbox to activate or deactivate the Template. Afterwards click on Next to save your changes to the Template, you can then close the wizard or further adjust the template, while going through the steps.
Attention:
You need to click the Next button in order to save the activation or deactivation of the template, else the changes will be set back.
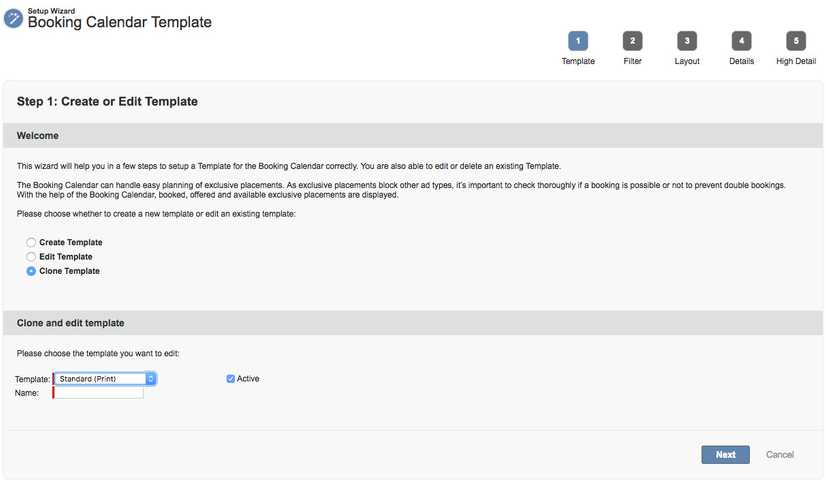
3. Clone Templates
In the first step in the Booking Calendar Settings select Clone.
- Pick the template you like to copy
- Enter a name for the new template
The next 4 steps are analog to the ones described above:
C. Custom Settings
With the help of the Booking Calendar, booked and offered and available exclusive placements are displayed in different colors and define some other default settings. Navigate to Setup - Custom Settings and click on Manage and Edit the ADvendio Settings:

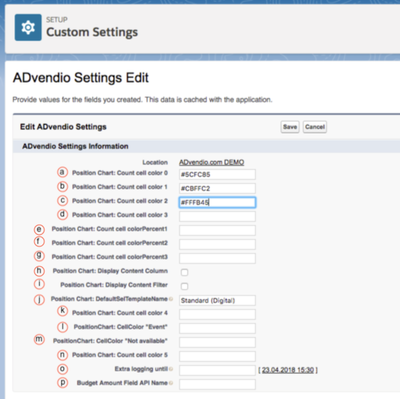
The system administrator is able to overwrite the standard color scheme and use custom colors. Just go to setup and enter HTML Color Code for the color you wish to use:
- Navigate to Setup > Develop > Custom Settings > ADvendio Settings and click Manage.
- Click the button Edit.
Position Chart: Count cell color 0: Position is completely available, booked + offered items = 0 Default Color: #5CFC85, dark green)
Position Chart: Count cell color 1: At least one offered item and no booked item, offered > 0 AND booked = 0 (Default Color: #CBFFC2, light green)
Position Chart: Count cell color 2: At least one booked item, but still at least 1 available, booked > 0 AND booked < maxApp (Default Color: #FFFB45, yellow)
Position Chart: Count cell color 3: The number of booked and offered items together is higher than the availability, offered + booked >= maxApp AND booked < maxApp (Default Color: #FCBF41, orange)
- Position Chart: Count cell colorPercent1
- Position Chart: Count cell colorPercent2
- Position Chart: Count cell colorPercent3
- Position Chart: Display Content Column: If set the Content is always part of the Columns (Booking Calendar Step 3 Content is always ON)
- Position Chart: Display Content Filter: If set the Content is always part of the Filters (Booking Calendar Step 2a Content is always ON)
- Position Chart: DefaultSelTemplateName: The template with this name is pre-selected in the chart type select list of the Position Chart.
Position Chart: Count cell color 4: The position is fully booked, there is nothing left available, booked = maxApp (Default Color: #FF0018, red)
- Position Chart: CellColor "Event"
- Position Chart: CellColor "Not Available"
- Position Chart: Count cell color 5: Overbooking, the number of booked items is higher than the availability, booked > maxApp (Default Color: #FF0018, red)
- Extra logging until: Until this date and time ADvendio logs more detailed information to the debug logs (which will slow ADvendio down).
- Budget Amount Field API Name: API name of the field which is subtracted from the budget.
- Click the button Save.
Probability, 100% = booked, <100% und >0% = offered
Warning: the default color for fully booked and overbooked positions is the same RED, please define a custom color to avoid technical issues!
D. Privacy Settings
If you like to have some kind of access control which limits users from seeing each other's Media Campaigns but the availability is still accounted for in the Booking Calendar - here is how to do it:
Just set the Media Campaign object as private (Setup - Sharing Settings). This way, all users will see the same view using the Booking Calendar (i.e., what inventory is available, booked, offered) because it does not use the Salesforce sharing model (means, sharing only private is ignored). The detail view shows the same behavior: every field is displayed with the information. So make sure to display only data that is not private to other users (like from date, until date, owner of this media campaign and stuff like that). In the case, you click on a link to a campaign you will get an error message showing "insufficient rights" if not owned by the active user.
You are ready to use the Booking Calendar!
If a template has been created, the Booking Calendar can be used if your inventory is prepared (see below).
Please navigate to the Booking Calendar:
- Navigate to App Launcher.
- Search for Booking Calendar.
- Click the link Booking Calendar.
- Select your Chart Type.