For our Self Service we delivered multiple components which can be reused in Flows in order to customize your Self Service as desired.
Below we explain to you everything that can be configured.
We started delivering the components in our release version 2.135 and more will be added in every upcoming release.
Version | 2.135 and up |
|---|---|
License | SelfService |
Please find a full list of the components below:
Component | Purpose | Delivery |
|---|---|---|
Campaign creation | Set campaign parameters such as name, campaign goal, runtime and budget. | delivered in 2.135 |
Audience selection | Define the audiences you would like to reach with your ads. | delivered in 2.135 |
Result list | Receive products that fit to your search criteria and add them to your basket. | delivered in 2.138 |
Shopping cart | Get an overview of your basket and make some last minute changes such as quantities or removing products from the basket. | delivered in 2.138 |
Payment | Get an invoice in order to pay the invoice. | delivered in 2.140 |
Creative upload | Define all the criteria needed for the creatives and upload your creatives. | to be delivered in Q2/2021 |
You can start setting up your Self Service by creating a Digital Experience. Please find the steps right here: 9.1 Create a Portal (Digital Experience)
After the Community is set up you will need to create a flow. You can do this by entering the Setup of your Salesforce org.
When you enter “Flows” in the Quick Search Bar you will be able to open that point under the section Process Automation.
If you do not know Flows well we recommend to do the following trailhead from Salesforce: https://trailhead.salesforce.com/content/learn/modules/flow-basics
Create a new flow and select the type screen flow. You can select a layout type. Choose whatever you prefer.
Campaign creation
The first step is to add a new screen component to the flow.
On the left side under the section Custom you will find the component Campaign Creation. Add it to the screen.
Sometimes you might need to cancel the component and add it again in order to see all components on the left side (only initially).
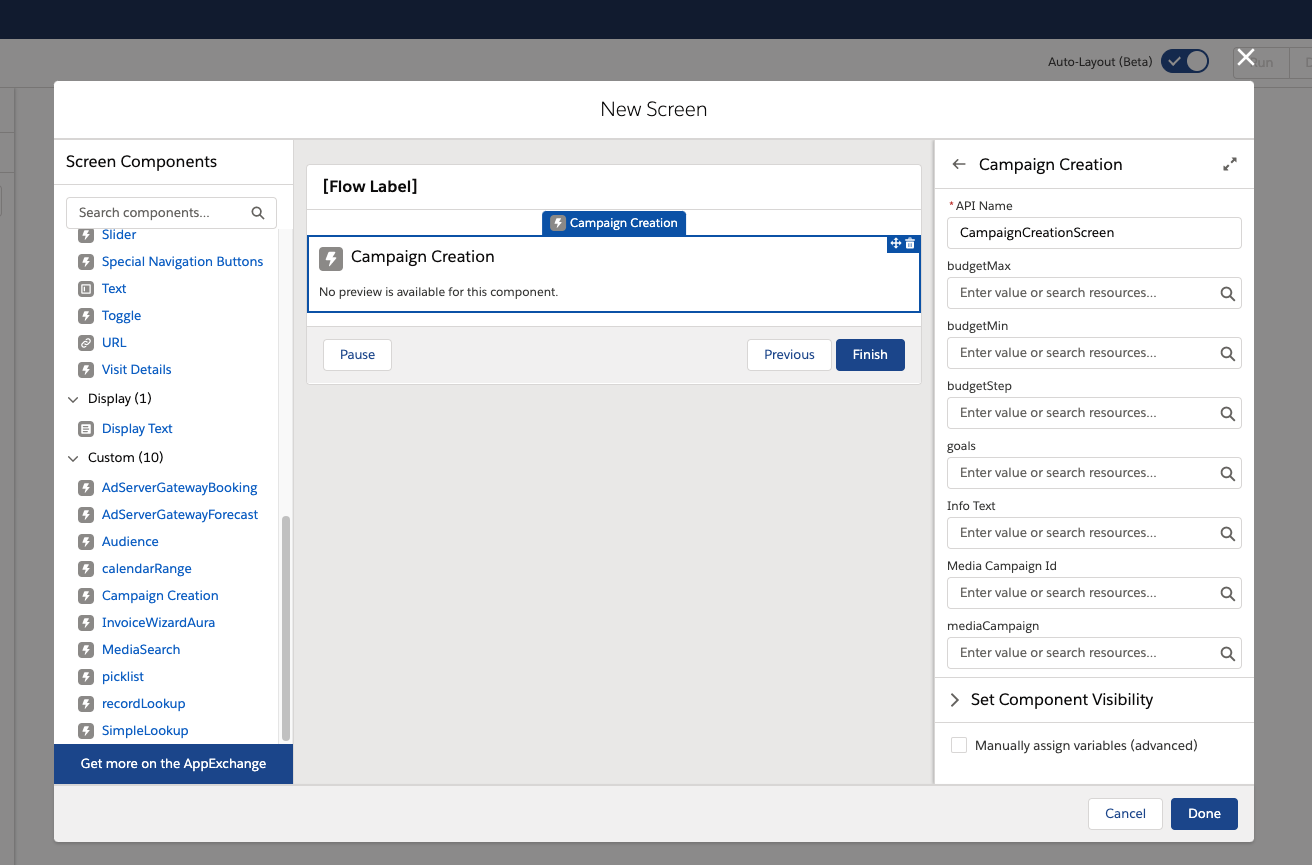
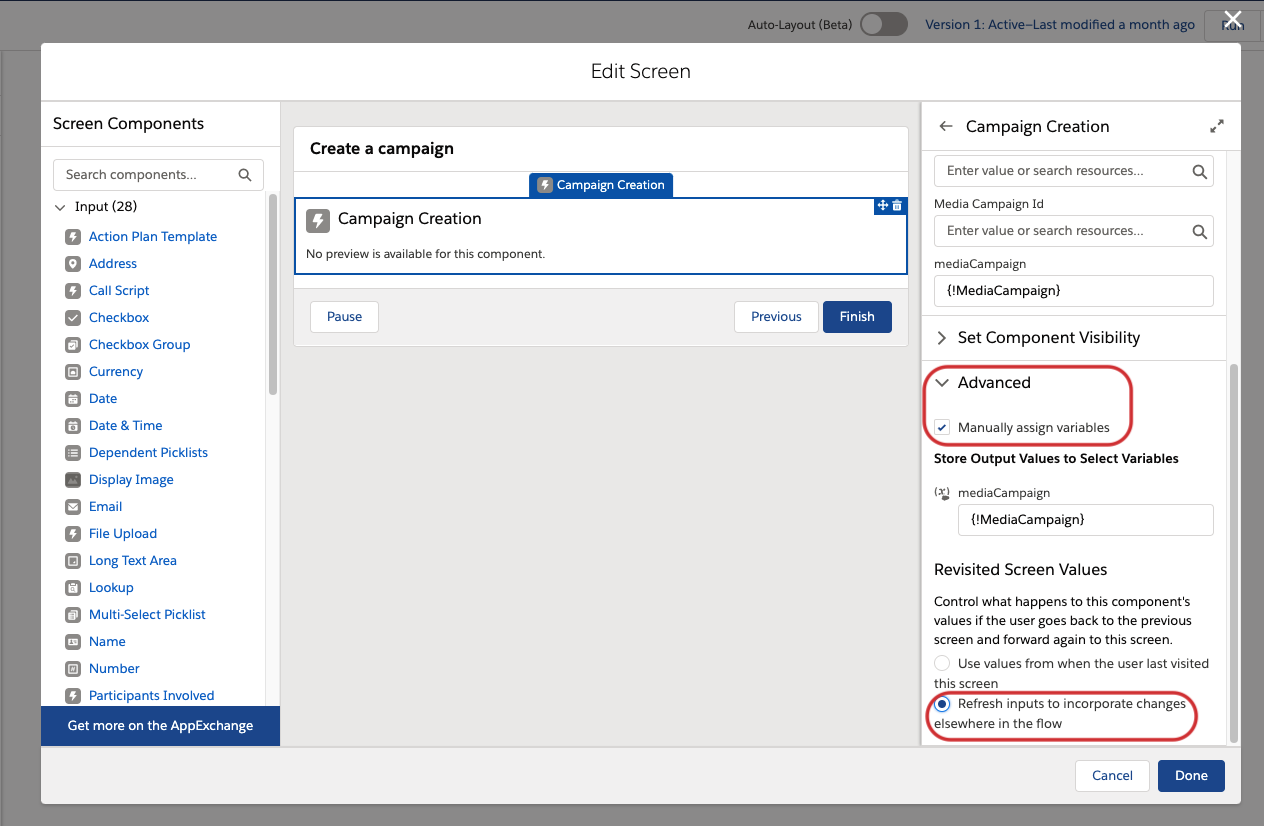
The parameters on the right hand side of the component are explained below. The output parameters need to be defined by setting the checkbox “Manually assign variables (advanced)” to true in the Advanced section for the component. You should also set the radio button in the “Revisit Screen Values” section to true saying “Refresh inputs to incorporate changes elsewhere in the flow”.
Input/Output | Required? | Parameter | Meaning | Value format | Default value |
|---|---|---|---|---|---|
Input | no | budgetMax | Set the maximum number of budget that should be selectable. | number | 20,000 |
Input | no | budgetMin | Set the minimum number of budget that should be selectable. | number | 500 |
Input | no | budgetStep | Set the step value that should be applied while using the slider. | number | 500 |
Input | no | goals | Enter a custom setup of the Campaign Goals to customize them for your needs. | JSON string | please see below |
Input | no | Info Text | Enter an info text that will be shown below the budget in order to give a hint to the user. | text | empty |
Input | no | Media Campaign Id | (not relevant for now) | id of a Media Campaign | empty |
Input | yes | mediaCampaign | Enter the variable of a Media Campaign that can be used for saving the Media Campaign to be configured virtually. | record variable of data type Media Campaign | empty |
Output | yes | mediaCampaign | Enter the variable of the Media Campaign from above in order to hand over the entered parameters to the next component. | record variable of data type Media Campaign | empty |
This Campaign Creation component uses an input for goals in order to be more dynamic. This is the default configuration if no other input is provided in the setup of the component:
[
   {
      "label":"Brand Awareness",
      "description":"Increase the awareness and visibility of a brand.",
      "iconName":"standard:catalog",
      "picklistValue":"brand awareness"
   },
   {
      "label":"Conversion",
      "description":"Execute specific actions such as making a purchase.",
      "iconName":"custom:custom26",
      "picklistValue":"conversion"
   },
   {
      "label":"Reach",
      "description":"Reach the maximum number of people in your target group.",
      "iconName":"standard:customers",
      "picklistValue":"reach"
   }
]
The format can be built like this:
label: Define how the goal name should be displayed.description: Enter a description to let the users understand what this goal means.iconName: Enter a name for the icon that fits to your goal. You can use all icons from this library: https://www.lightningdesignsystem.com/icons/ Please keep in mind to add “standard:” or “custom:” in front of the icon name as you can see in the example above.
picklistValue: Enter the API name of the goal value in your Media Campaigns Campaign Goal field in order to match it later to the results.translations: You can add translations for other languages to your setup. Please find below an example for a German translation. If you want to translate this for another language please replace “de” with the language code from this list: https://help.salesforce.com/articleView?id=faq_getstart_what_languages_does.htm&type=5"translations": { "de": { "label": "Markenbekanntheit", "description": "Ziel ist es die Bekanntheit je Zielgruppe zu erhöhen." } }
We recommend using a JSON online formatter to ensure a correct JSON string. For example you could use this one: https://jsonformatter.curiousconcept.com/#
After adding the component to your screen flow connect an arrow from the start object to the Campaign Creation component.
Audience
The second step is to add a new screen component to the flow.
On the left side under the section Custom you will find the component Audience. Add it to the screen.
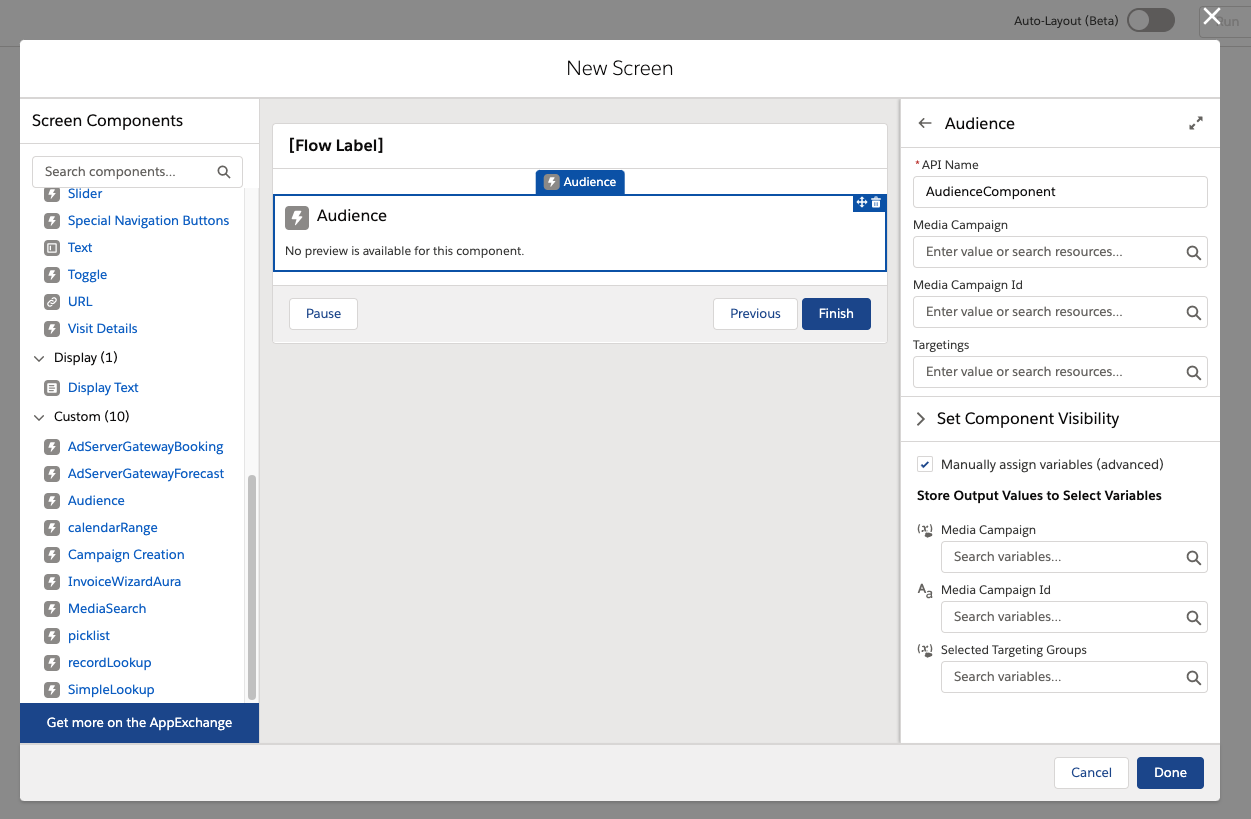
The parameters on the right hand side of the component are explained below. The output parameters need to be defined by setting the checkbox “Manually assign variables (advanced)” to true in the Advanced section for the component. You should also set the radio button in the “Revisit Screen Values” section to true saying “Use values from when the user last visited the screen”.
Input/Output | Required? | Parameter | Meaning | Value format | Default value |
|---|---|---|---|---|---|
Input | yes | Media Campaign | Enter the variable of the Media Campaign from the first component to take over the Media Campaign parameters. | record variable of data type Media Campaign | empty |
Input | yes | Selected Targeting Groups | Enter a variable for Targeting Groups in order to load the entered parameterswhen navigating between different screens. | collection (Allow multiple values) variable of data type Targeting Group | empty |
Input | no | Media Campaign Id | (not relevant for now) | id of a Media Campaign | empty |
Input | no | Targetings | Enter a custom setup of the Audience selection to customize it for your needs. | JSON string | please see below |
Output | no | Media Campaign | Enter the variable of the Media Campaign from the first screen in order to hand over the parameters to the next component. | record variable of type Media Campaign → should be left empty | empty |
Output | no | Media Campaign Id | (not relevant for now) | id of a Media Campaign | empty |
Output | yes | Selected Targeting Groups | Enter a variable of Targeting Groups in order to hand over the entered parameters to the next component. | collection (Allow multiple values) variable of data type Targeting Group | empty |
This Audience component uses an input for targetings in order to be more dynamic. This is the default configuration if no other input is provided in the setup of the component:
[{
      "categories": "Geography - Country;Geography - City;Geography - Region",
      "header": "Where do your potential customers live?",
      "categoryText": "Countries",
      "type": "lookup"
    },
    {
      "categories": "Age",
      "header": "What are the age cohorts you wish to target?",
      "categoryText": "Age",
      "type": "picker"
    },
    {
      "categories": "Gender",
      "header": "What genders do you wish to target?",
      "categoryText": "Gender",
      "type": "checkbox"
    },
    {
      "categories": "Interest",
      "header": "Do your potential customers have any of these interests?",
      "categoryText": "Interest",
      "type": "checkbox"
    }
  ]
The format can be built like this:
categories: Targeting Group category, it can be multiple ones, if thats the case they must be separated with a “;” like “category1;category2”.header: The header that will be shown above the input. You can use it as a question to explain to the users what to enter here.categoryText: A label that will be shown above the input field and below the header. Here you could use the category name.type: The type of the input, currently there are 3 types accepted which you can use interchangeably:checkboxlookuppicker
We recommend using a JSON online formatter to ensure a correct JSON string. For example you could use this one: https://jsonformatter.curiousconcept.com/#
After adding the component to your screen flow connect an arrow from the Campaign Creation component to your newly created Audience component.
Select Products
The third step is to add another new screen component to the flow.
On the left side under the section Custom you will find the component Result List. Add it to the screen.
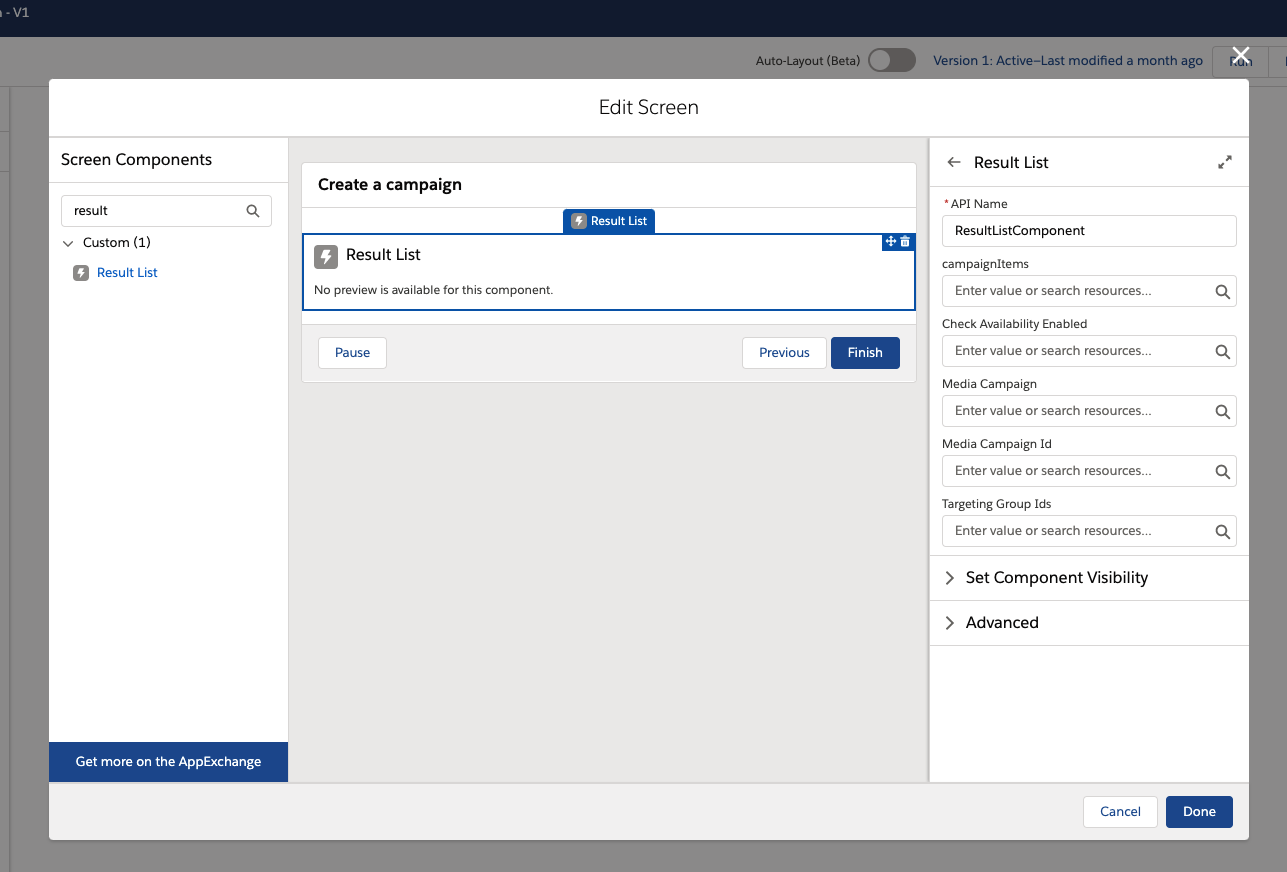
The parameters on the right hand side of the component are explained below. The output parameters need to be defined by setting the checkbox “Manually assign variables (advanced)” to true in the Advanced section for the component. You should also set the radio button in the “Revisit Screen Values” section to true saying “Refresh inputs to incorporate changes elsewhere in the flow”.
Input/Output | Required? | Parameter | Meaning | Value format | Default value |
|---|---|---|---|---|---|
Input | yes | campaignItems | Enter a variable to save the Campaign Items that will start to be created in this component. | collection (Allow multiple values) variable of data type Campaign Item | empty |
Input | no | Check Availability Enabled | Please enter a value that defines if an availability check should be done when starting the Result List or not. The availability check will be done for digital items as well as exclusive items. | boolean | false |
Input | yes | Media Campaign | Enter the variable of the Media Campaign from the first component to take over the Media Campaign parameters. | record variable of data type Media Campaign | empty |
Input | no | Media Campaign Id | (not relevant for now) | id of a Media Campaign | empty |
Input | yes | Targeting Group Ids | Enter the existing variable for Targeting Groups in order to load the entered parameters on this screen. | collection (Allow multiple values) variable of data type Targeting Group | empty |
Output | yes | campaignItems | Enter the variable from the Input parameters again to hand over the Campaign Items in the basket to the next component. | collection (Allow multiple values) variable of data type Campaign Item | empty |
Output | yes | Media Campaign | Enter the variable of the Media Campaign from the first screen in order to hand over the parameters to the next component. | record variable of type Media Campaign | empty |
Output | no | Media Campaign Id | (not relevant for now) | id of a Media Campaign | empty |
Output | yes | Targeting Group Ids | Enter the existing variable of Targeting Groups in order to hand over the values to the next component. | collection (Allow multiple values) variable of data type Targeting Group | empty |
Shopping cart
The fourth step is to add another new screen component to the flow.
On the left side under the section Custom you will find the component Summary. Add it to the screen.
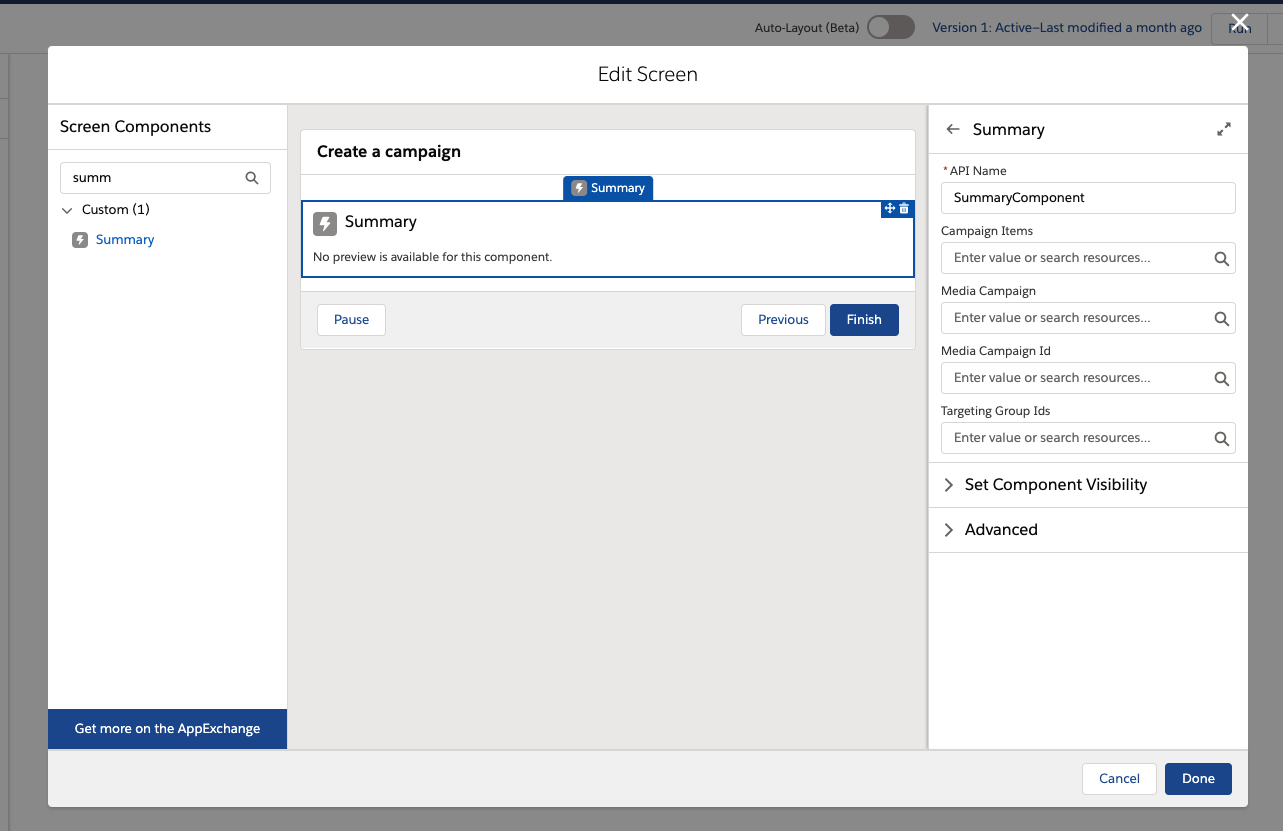
The parameters on the right hand side of the component are explained below. The output parameters need to be defined by setting the checkbox “Manually assign variables (advanced)” to true in the Advanced section for the component. You should also set the radio button in the “Revisit Screen Values” section to true saying “Refresh inputs to incorporate changes elsewhere in the flow”.
Input/Output | Required? | Parameter | Meaning | Value format | Default value |
|---|---|---|---|---|---|
Input | yes | Campaign Items | Enter the variable from the third screen to load the basket items into this component. | collection (Allow multiple values) variable of data type Campaign Item | empty |
Input | yes | Media Campaign | Enter the variable of the Media Campaign from the first component to take over the Media Campaign parameters. | record variable of data type Media Campaign | empty |
Input | no | Media Campaign Id | (not relevant for now) | id of a Media Campaign | empty |
Input | yes | Targeting Group Ids | Enter the existing variable for Targeting Groups in order to load the entered parameters on this screen. | collection (Allow multiple values) variable of data type Targeting Group | empty |
Output | yes | campaignItems | Enter the variable from the third screen to hand over the Campaign Items in the basket to the next component. | collection (Allow multiple values) variable of data type Campaign Item | empty |
Output | yes | Media Campaign | Enter the variable of the Media Campaign from the first screen in order to hand over the parameters to the next component. | record variable of type Media Campaign | empty |
Output | no | Media Campaign Id | (not relevant for now) | id of a Media Campaign | empty |
Output | yes | Targeting Group Ids | Enter the existing variable of Targeting Groups in order to hand over the values to the next component. | collection (Allow multiple values) variable of data type Targeting Group | empty |
The Summary component will calculate the VAT values based on the Media Campaign information. To calculate VAT rates please keep in mind to
either set manually the needed information in the virtual Media Campaign by using an assignment component (Fields to be set then are the debtor and depending on your VAT setup the following: VAT Rate % Type 1A, Type 1B, Type 2A and Type 2B).
or you could also receive the relevant details by creating the Media Campaign before getting to the screen and then query the calculated details for the VAT calculation before starting the summary screen. You would still need to define the debtor to be set in the Media Campaign before creation.
Payment
The fifth step is to add another new screen component to the flow.
On the left side under the section Custom you will find the component Payment. Add it to the screen.
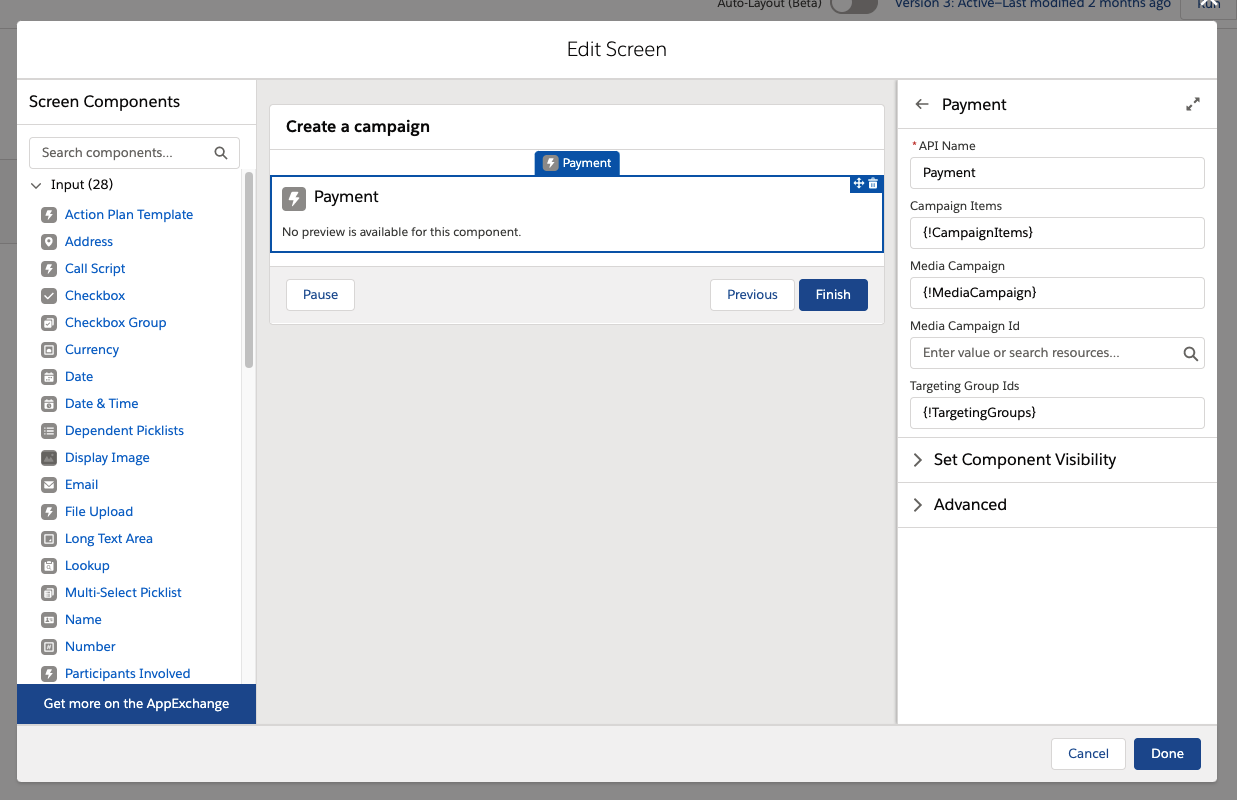
The parameters on the right hand side of the component are explained below. The output parameters need to be defined by setting the checkbox “Manually assign variables (advanced)” to true in the Advanced section for the component. You should also set the radio button in the “Revisit Screen Values” section to true saying “Refresh inputs to incorporate changes elsewhere in the flow”.
Input/Output | Required? | Parameter | Meaning | Value format | Default value |
|---|---|---|---|---|---|
Input | yes | Campaign Items | Enter the variable from the third screen to load the basket items into this component. | collection (Allow multiple values) variable of data type Campaign Item | empty |
Input | yes | Media Campaign | Enter the variable of the Media Campaign from the first component to take over the Media Campaign parameters. | record variable of data type Media Campaign | empty |
Input | no | Media Campaign Id | (not relevant for now) | id of a Media Campaign | empty |
Input | yes | Targeting Group Ids | Enter the existing variable for Targeting Groups in order to load the entered parameters on this screen. | collection (Allow multiple values) variable of data type Targeting Group | empty |
Output | yes | Campaign Items | Enter the variable from the third screen to hand over the Campaign Items in the basket to the next component. | collection (Allow multiple values) variable of data type Campaign Item | empty |
Output | no | Debtor Account | In case you needed to complete the billing address in the component this will deliver the updated debtor account that will need to be updated in the flow directly afterwards. | record variable of data type Account | empty |
Output | yes | Media Campaign | Enter the variable of the Media Campaign from the first screen in order to hand over the parameters to the next component. | record variable of type Media Campaign | empty |
Output | no | Media Campaign Id | (not relevant for now) | id of a Media Campaign | empty |
Output | yes | Targeting Group Ids | Enter the existing variable of Targeting Groups in order to hand over the values to the next component. | collection (Allow multiple values) variable of data type Targeting Group | empty |
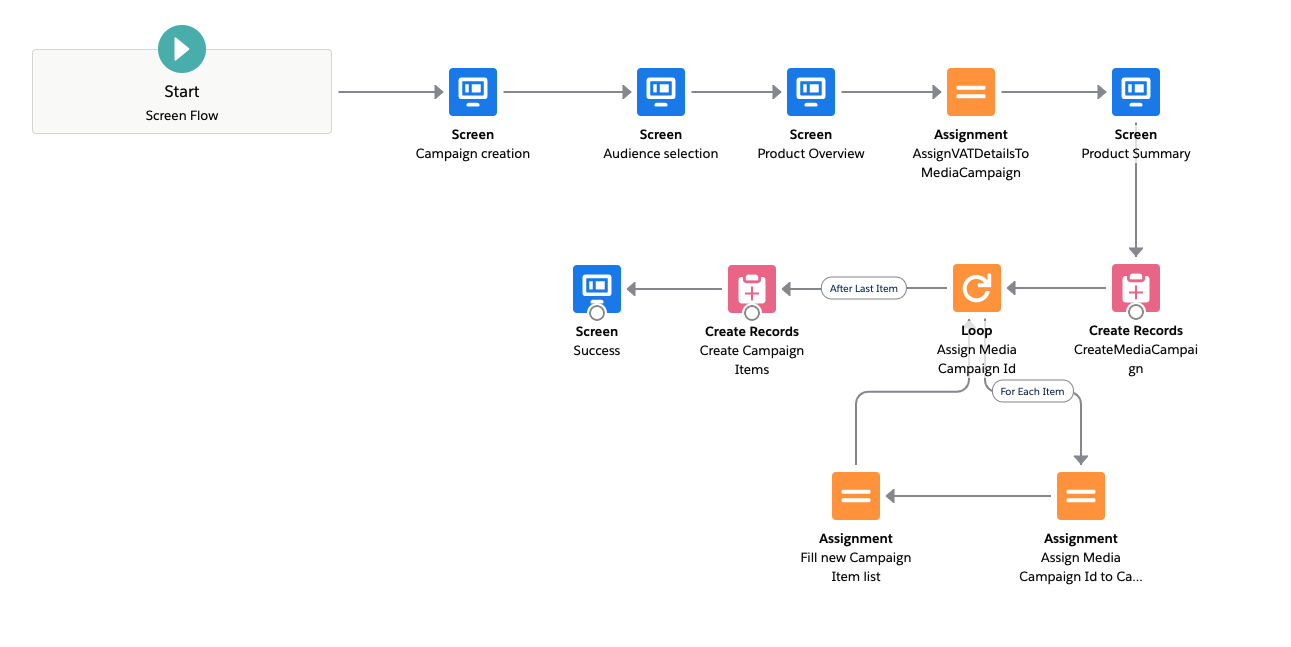
Creating records
Now you might want to create the records in order to prepare everything for the payment.
In order to do this you will need to use the Create Records element to create the Media Campaign first (if not already done).
Before you can create the Campaign Items now you will need to update the Media Campaign Id in the virtual Campaign Items so that they will be connected to the right campaign.
You can do this by using a Loop element going through your Campaign Item record collection variable.
Using the Assignment element you can set the Media Campaign record id in every Campaign Item that needs to be created.
After that element you will need another Assignment element to fill a new Campaign Item collection variable because your changes will not be reflected in the existing variable.
After the last item if the loop element you can then use the Create Records element to finally create your Campaign items.
Create Invoices
After the user decided how he wants to pay in the next step the invoices need to be created so that the user receives the invoice per mail and can download it directly in the system.
To set this up a few new elements are needed in the flow.
The first one needed is an action (not a screen). In the search you will need to enter “FlowInvocableProcess“. The parameters for the action are explained below. You can define the input parameter by checking the toggle next to parameters to true. The output parameters need to be defined by setting the checkbox “Manually assign variables” to true in the Advanced section for the component. For the transaction control you can select the recommended value (Let the flow decide).
Input/Output | Required? | Parameter | Meaning | Value format | Default value |
|---|---|---|---|---|---|
Input | yes | action | Enter the action that will be called to create the invoices: “CreateInvoices” | string, “CreateInvoices“ | empty |
Input | yes | parameters | Enter the variable that holds the Media Campaign Ids to be invoiced. | collection (Allow multiple values) variable of data type text | empty |
Output | no | message | Enter a text variable to hold possible messages. | text variable | empty |
Output | yes | results | Enter a collection variable for data type text that can hold the invoice ids after creating the Pre-Invoices. | collection (Allow multiple values) variable of data type text | empty |
Output | no | status | Enter a text variable to hold the status. | text variable | empty |
After creating this element the next step is to loop through the Pre-Invoice Ids (received from the previous component) in order to start the Billing Run job.
For each item of the collection a new screen will be called that needs to be added. The component is called Billing Run Initiator.
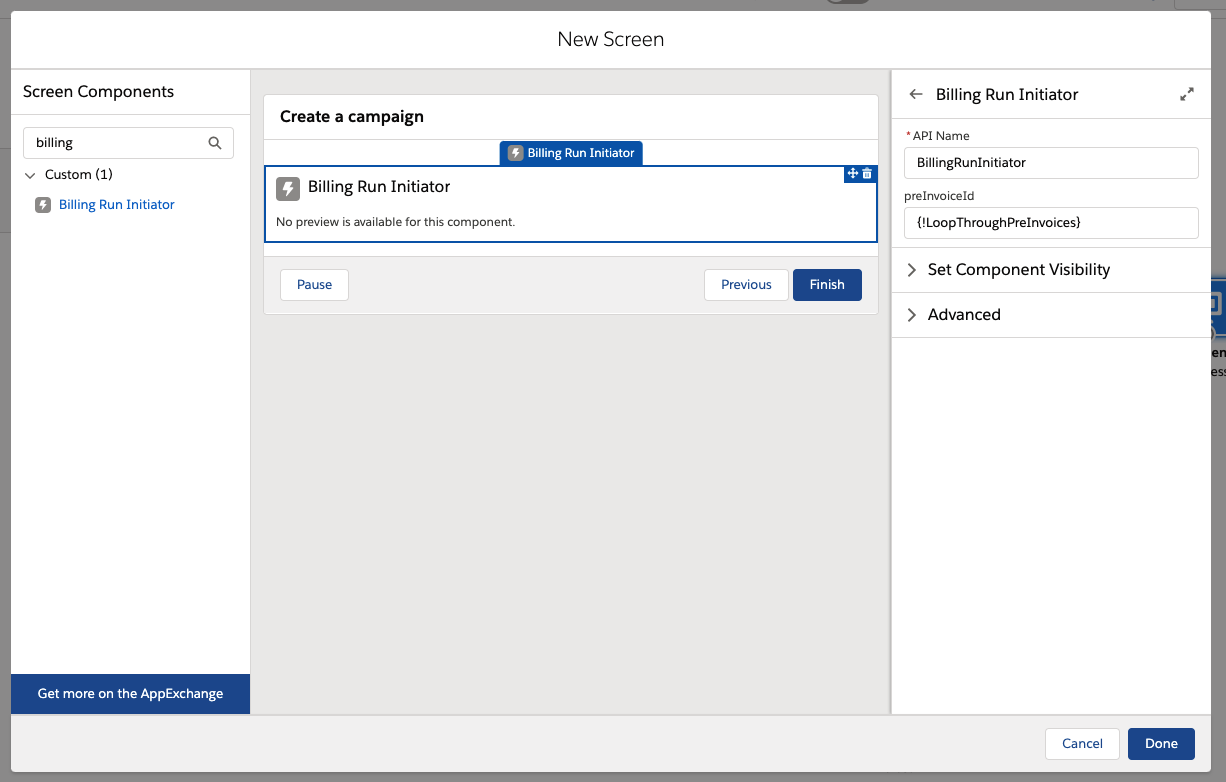
The parameters on the right hand side of the component are explained below. The output parameters need to be defined by setting the checkbox “Manually assign variables (advanced)” to true in the Advanced section for the component. You should also set the radio button in the “Revisit Screen Values” section to true saying “Refresh inputs to incorporate changes elsewhere in the flow”.
Input/Output | Required? | Parameter | Meaning | Value format | Default value |
|---|---|---|---|---|---|
Input | yes | preInvoiceId | Enter the variable that holds the current item from the loop. | current item from the loop | empty |
Output | no | Error Messages | Enter a text variable to hold possible messages. | text variable | empty |
Output | yes | preInvoiceId | Enter the variable that hold the current item from the loop. | current item from the loop | empty |
Output | no | Status | Enter a text variable to hold the status. | text variable | empty |
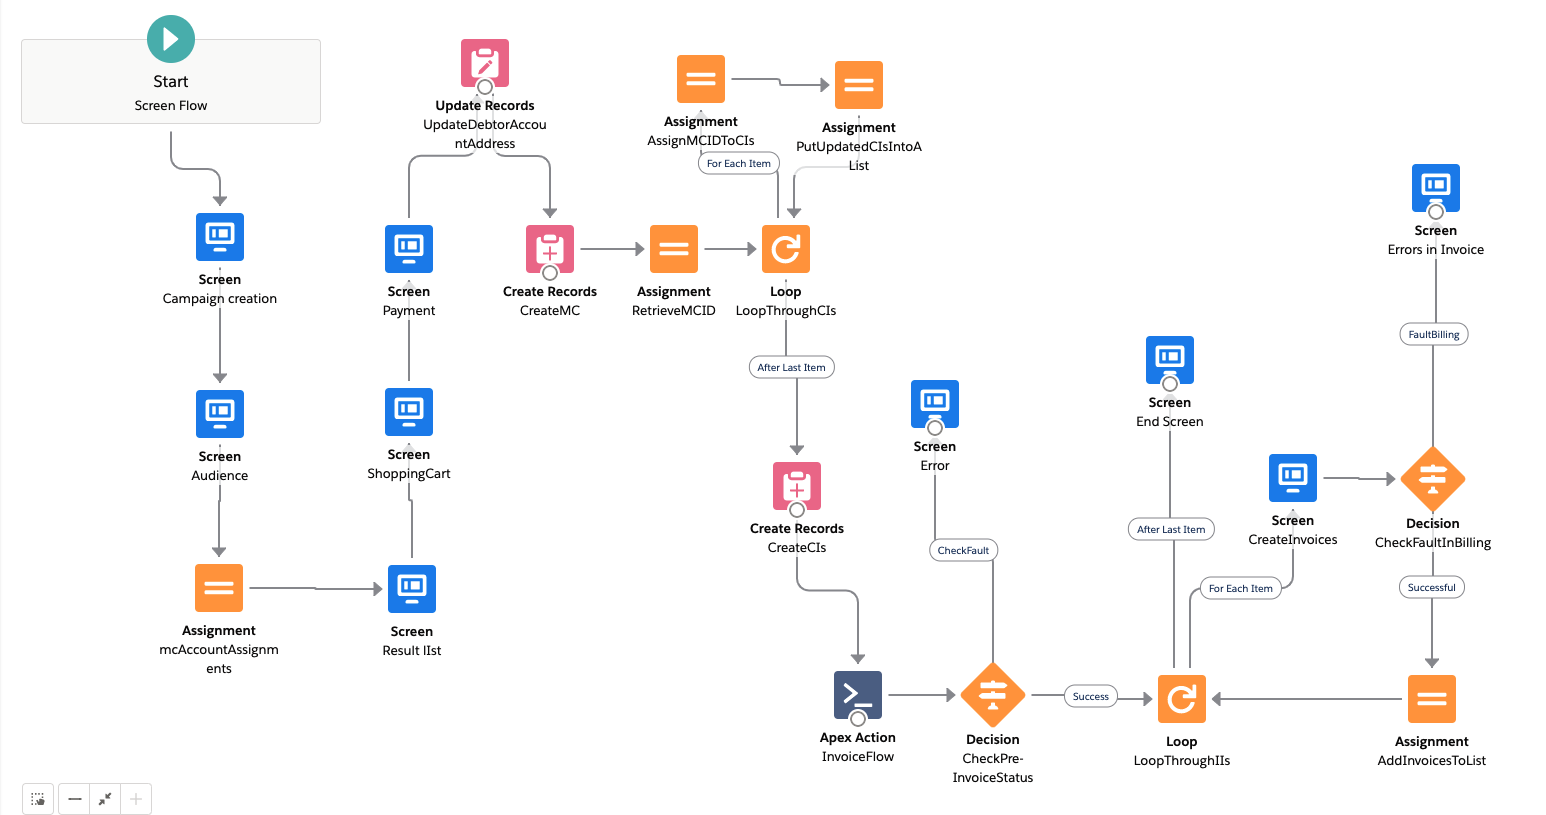
Please find below a screenshot how your setup could look like now.
After this you can simply save and activate your flow. Now the last step is to place your flow in your Self Service portal (Site) at the right place.
Error Handling
A good user experience is essential to keep your users on the page. Good error handling is needed to give the customer a good feeling when using the Self Service. In order to enable a good error handling we suggest the improvements which are pointed out below for your flow. We ensure a good error handling while using the screens. Nevertheless you might need to work with enhancements, e.g. to validate given inputs.
Validate inputs
Some fields may be marked as required but the navigation to the next page is still possible. In order to disable this you will need to use decision elements that guide the user back to the original screen showing an error at the top or bottom of the page.
Faults for DML operations
For the creation of records Salesforce offers by default to add a second “fault” path for your element (Create, Update or Delete records). You should use this in order to show validation rules or similar errors a user could run into.
Faults in the Invoicing Process
The invoicing process can throw a few errors when the given data are not complete as expected. In these cases you should use the status output as well as the message/error outputs in order to decide if an error message is needed or if the user can proceed with the flow.
Component | Error Status | Output variable holding the status | Output variable holding the error message |
|---|---|---|---|
FlowInvocableProcess (CreateInvoices) | ERROR | status | message |
flowBillingRunInitiator | failure | Status | Error Messages |