The most important functions to manage media campaigns are displayed as buttons at the top of each media campaign record's details. There are standard buttons, i.e. Edit and Delete, as well as custom buttons. To maximize your ADvendio.com system's usability, you can customize both types of buttons. The new choice of buttons will be displayed in all media campaign records.
Media Campaign Buttons
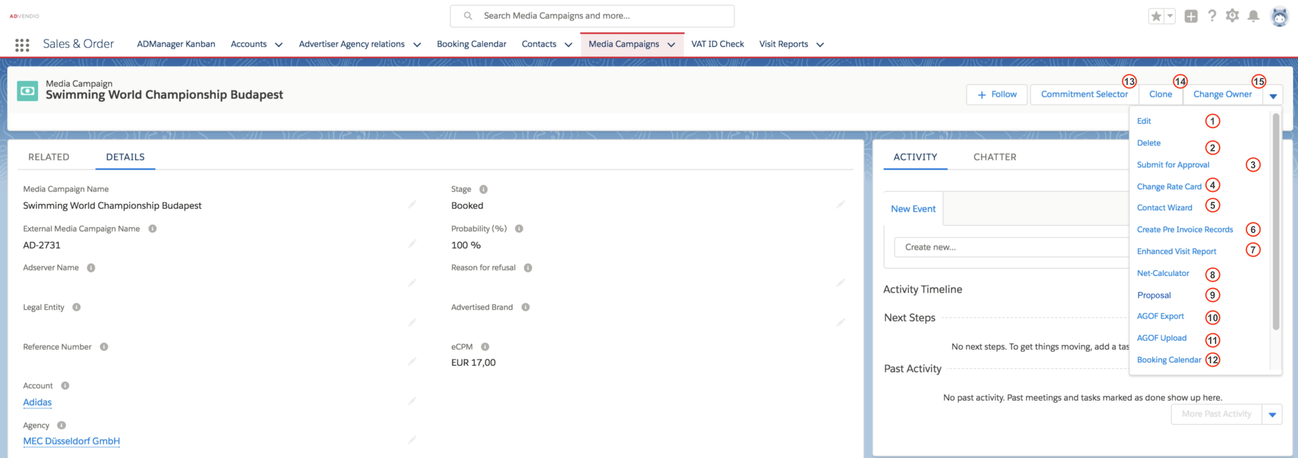
Besides letting you edit, delete, and clone media campaigns, the following buttons allow you to start various other ADvendio functions. Depending on your configuration you might have the following buttons available:
- Edit: Edit details of the Media Campaign as such, e.g. the stage or the assigned agency.
- Delete: You are able to delete the whole campaign with a click on this button.
- Submit for Approval: If you want to create a proposal and need your superior's consent, click this button to receive his or her feedback.
- Change Rate Card: Each media campaign is assigned to a certain rate card to make sure you pick only those prices which are up-to-date for the campaign's period.
- Contact Wizard: Limiting the available contacts to those who are related to the media campaign's agency and advertiser, the contact wizard lets you assign contacts and primary contacts to the media campaign within seconds. This feature is very helpful if you need to change the primary contact, e.g. if you want to send out a proposal or order confirmation. 4.2.7 Contact Wizard and Account Lookups.
- Create Pre Invoice Records: 6.2.1 Create Pre-Invoices (manually)
- Enhanced Visit Report: With ADvendio it's easy to create visit reports, automatically filled with information on the campaign, the assigned agency, advertiser and contacts. 2.3.2 Use Visit Report.
- Net Calculator: To adjust the amounts and discounts of the campaign items, use the Net Calculator. 4.5 Net Calculator
- Proposal: To create an automatically filled proposal ready to be sent to your customer, click the Proposal button. 4.6 Create Proposals / Offer Documents
- AGOF Export: 4.14 Import and Export AGOF Connect Data
- AGOF Upload: 4.14 Import and Export AGOF Connect Data
- Booking Calendar: 4.9 Booking Calendar
- Commitment Selector: helps you to link your Commitment to your Media Campaign. 4.16.2 Assign Commitments to Media Campaigns
- Clone: If you want to create a similar or identical campaign without starting from scratch, use the Clone button to create a twin campaign.
- Change Owner: Standard Salesforce function to change the owner of a record.
Campaign Item Buttons
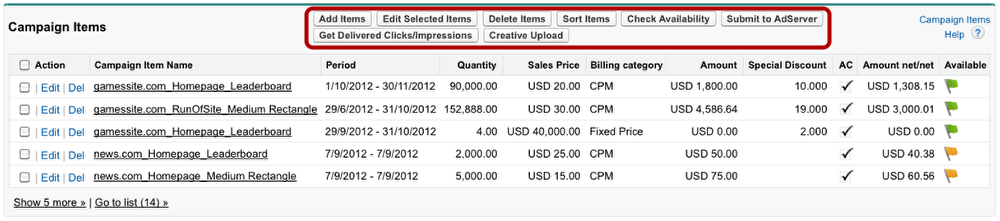
On top of the related list of Campaign Items, you find a number of buttons which represent the main functions when working with campaign items. Many of these initiate a data transfer with your ad server.
- Add Items: This button opens the media search where you are able to select further items and add them to your media campaign.
- Edit Selected Items: Select items and click this button to open the media configuration where you are able to enter pricing and targeting information.
- Delete Items: Select one or several items and click this button to delete them from your media campaign.
- Sort Items: When you click this button you are directed to a page where you can either sort the items manually with drag & drop or click on the Sort by Standard Sorting to apply a previously defined order to the campaign items. For example, they could be sorted by start date.
- Check Availability: This button starts a data transfer between your ADvendio.com system and your ad server. The campaign item information is transferred to your ad server. There, the availability of these items is tested. The result is sent back to ADvendio.com.
- Submit to Ad Server: When your customer has ordered the media campaign, select all items and click this button to submit the order to your ad server.
- Get Delivered Clicks/Impressions: This is a report function to receive feedback on already delivered clicks and impressions. Evaluating this data, you are able to react to previously entered settings in order to reach your customer's specifications.
- Create Upload: Select a campaign item and click this button to upload a creative for this campaign item to your ad server. Please check on our website if the creative upload feature is supported by your ad server.